Unexpected restarts, "blue screens of death," OS freezes, and lags in the Windows interface are all signs of faulty RAM. Today, we’ll explain how to test RAM for errors, which tools you'll need, and what to do if issues are detected.
Why RAM Starts Having Errors
In most cases, the cause is a manufacturing defect. Memory chips can degrade over time, revealing hidden production flaws. These defects lead to unstable RAM module performance and various system errors.
Other potential causes include:
- Incorrectly set parameters in the motherboard BIOS;
- Damaged RAM slots on the motherboard;
- Faulty CPU memory controller;
- Oxidized RAM contact points.
Errors in Windows OS performance may not always be due to RAM. For instance, an older computer might have a failing hard drive or another defective component. However, diagnosing a PC should always begin with a RAM check, as it is one of the most common causes of system instability.

How to Test RAM for Errors
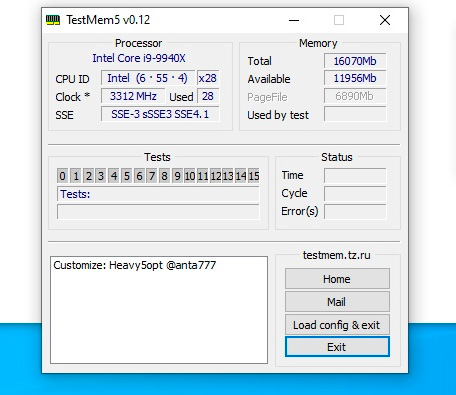
To begin, download the free program TestMem5. Installation isn’t required—just unpack the downloaded archive file to any convenient location, like your desktop. Also, download the configuration files, unzip them, and move the extreme@anta777 file to the TM5 folder.
Next, open the utility by launching the TM5.exe shortcut and select "Configure and Exit." Choose the extreme@anta777 file, which will close the program. Then restart the utility, and it will automatically begin searching for errors.
Wait for the process to finish and check the results in the dialog box. If it shows "no errors," your RAM is fine. If issues are found, there are steps you can take to address them.
What to Do If Errors Are Detected
First, go to your motherboard’s BIOS and reset the settings. To do this, restart your computer, pressing the Delete key during boot. Once in the BIOS, go to the “Save and Exit Setup” tab. Select “Load Setup Defaults,” then allow the computer to restart.
Run TestMem5 again and review the results. If errors persist, the goal is to locate the faulty RAM module. Power down your PC, unplug it, turn off the power switch, remove the side cover, and take out one RAM stick. Note that each RAM stick is held in place by latches at the top and bottom that need to be pushed down.
Remove one RAM stick at a time, restart the computer, and test with TestMem5 to determine which RAM stick is faulty. Once you find the malfunctioning module, don't discard it just yet. Use an eraser to clean the metal contacts on the RAM, then use a brush or dry cloth to clear away any debris. There’s a chance that oxidation of the contacts caused the issue, and cleaning might restore functionality.
If cleaning doesn’t help and errors persist, discard the faulty RAM module and buy a new one with the same frequency and timing specs. Repairing RAM is costly; it’s much cheaper to replace it. If your RAM is under warranty, you can return it to the store.
How to check pc RAM: Conclusion
To check RAM for errors:
- Download and extract the TestMem5 utility;
- Download and unpack the extreme@anta777 configuration file into the TM5 folder;
- Run the test and wait for the results.
It’s not strictly necessary to download a special utility to check RAM for errors. Windows has its own built-in RAM checker, but it detects only critical issues. The minor errors, which are more common, are usually missed by the Windows tool, so we recommend using TestMem5.
HYPERPC RAM in Computers
All HYPERPC computers undergo thorough stress testing. These programs allow us to identify any defects, faults, or manufacturing flaws. If our engineers find errors, we restart the production process. Rest assured, you will receive only those systems whose stable performance has been fully verified by our engineers through stress testing.