Thermal paste is a heat-conductive multi-component substance for better contact between the heated component and the radiator. It does not polymerize or change its state. If the paste dries up, it does not work properly. Ideally, even after five to six years, you should find a liquid paste-like substance under the radiator, at most with hardened edges. Thermal paste is used for installing cooling radiators for the chipset, CPU, and GPU.
Applying thermal paste to all components of the computer will not improve its performance. Its application is necessary only in places where there is close contact between the heated element and the radiator. It is needed to fill the microcracks on the CPU crystal and the heat-dissipating element. Paradoxically, any thermal paste, regardless of its quality, has lower thermal conductivity than any metal radiator, even the lowest quality one.
Thermal paste is not the only way to improve heat transfer. A group of such means is called thermal interfaces. An interface, meaning a junction, implies the contact between the radiator and the CPU itself. There are other means for this:
- Heat-conductive adhesive. It is useful when you need to glue the radiator where it is not provided. The most common use is for the power supply circuit. Functional radiators are rarely installed on these essential modules in motherboards. In normal mode, they do not require additional cooling, but during extreme overclocking experiments, it's better to protect your hardware with at least an aluminum plate.
- Polymerizing compounds. A type of thermal interface that has a curing time and works only in a solid state. Usually, these things are not used in computers, or rather, not used at home. It's not that it's too complicated and requires expensive equipment; it's just that all the important units are already covered with compound from the factory.
- Heat-conductive pads. They come in two types: silicone and metal. Silicone is used to dissipate heat from plastic chips, such as memory modules on a graphics card. Metal plates are most often made of copper or its alloys. They are also used for cooling various modules. In computer technology, they replace silicone pads. But this comes with several difficulties, which will be discussed later.
- Solder and liquid metal. At the beginning of the article, it was mentioned that no thermal paste can provide the same thermal conductivity as solid metal, such as copper or aluminum. If someone decided to solder the heated module to the radiator, they would get the best possible heat dissipation. But this is impossible since processors are built on silicon crystals, which is not a metal, so it cannot be soldered. However, there is liquid metal - and the first thing that comes to mind is mercury: it is liquid at room temperature, but its vapors are very toxic, and using it in consumer electronics is sheer recklessness. There is also a special "liquid metal" - a modern scientific achievement. It is a non-toxic alloy with a melting point of around 15-25°C. This is one of the best thermal conductors for electronics that you can find, but using it imposes several restrictions and presents many difficulties, which will be discussed later.
Where thermal paste is needed in a computer
Thermal interfaces are used wherever there are radiators. In the simplest motherboards, this is only the CPU. There is also always a radiator on the graphics card that requires additional close contact with the crystal. In gaming motherboards, passive cooling systems are installed on the power circuit, m.2 slots, northbridge, and southbridge. Thermal paste is not always used; sometimes silicone pads are used instead.
Where liquid metal is best applied
The only place where it makes sense to apply liquid metal is under the CPU lid; only there does it provide a significant improvement in heat dissipation. Under the CPU lid, which is glued with sealant, it is not at risk of leaking onto other computer components.
To better understand the performance improvement, the channel Digital ScorPion conducted its tests. We translated them into a convenient table.
| Average temperature, °C | Peak temperature, °C | |
|---|---|---|
| Liquid metal under the lid and radiator | 55 | 68 |
| Liquid metal under the lid and good thermal paste on the radiator | 58 | 71 |
| High-quality thermal paste under the lid and on the radiator | 73 | 89 |
| Stock paste under the lid and good paste on the radiator | 84 | 94 |
As you can see, liquid metal gives a significant advantage when overclocking the CPU, but only when applied under the lid. Applying it under the radiator does not give a noticeable increase in thermal conductivity. Good thermal paste handles this very well; the difference is only 3°C.
How to choose thermal paste
We refer to the latest tests from the Digital ScorPion channel. The author compared all thermal pastes available on the Russian market as objectively as possible. The temperature during his CPU overclocking is indicated, the specific model doesn't matter. The important thing is that the computer configuration and the radiator were not changed.
We selected several of the most popular thermal pastes that have earned high popularity and are worth your attention:
- Arctic MX-4 – 84°C
- ArcticSilver 5 – 85°C
- CoolerMaster MasterGel Maker – 82.7°C
- Cryorig CP5 – 85°C
- DeepCool Z9 – 85.3°C
- EK Water Blocks EK-Tim – 83.8°C
- Innovation Cooling IC Diamond 24 Carat – 82.7°C
- KingPin Cooling KPx – 80°C
- Noctua NT-H1 – 84.8°C
- Noctua NT-H2 – 80.8°C
- ProlimaTech PK-3 – 82°C
- Thermal Grizzly Kryonaut – 84.5°C
- Thermal Grizzly Hydronaut – 85.8°C
- Thermal Grizzly Carbonaut – 87°C
- ProlimaTech PK-3 – 82°C
- KPT-8 – 92.2°C
Testing is not everything; longevity and ease of application are also crucial. Therefore, among other factors, it is better to choose pastes from well-known brands. For example, Noctua has some of the best long-term performance indicators. And Arctic MX-4 has been a popular choice for years due to its price-to-quality ratio. However, due to its popularity, there are many counterfeits online.
There is an opinion that you can use toothpaste. If you apply toothpaste to the CPU, nothing will happen to it (of course, if it doesn't leak onto the motherboard), but the result will definitely disappoint you. The difference between a "bare" junction and using toothpaste is almost non-existent.
How often should you change the thermal paste?
On the CPU and GPU, it is advisable to replace the thermal interface once a year to a year and a half along with a full cleaning. But if you use high-quality paste, such as Noctua NT-H2, you can rely on temperatures and cooling system noise.
The more difficult it is to dissipate heat, the louder the fans will roar. The thermometer measures the temperature inside the CPU, and if it exceeds a certain threshold, it speeds up the fan, which you will definitely hear. If the heat is too slowly dissipated from the CPU to the radiator, the fan will roar, and the CPU will still remain hot. This is a clear signal to clean the computer and replace the thermal paste.
How often should you change the thermal paste in a laptop?
Ideally, about once a year, again, assuming you are using high-quality paste. But replacing the thermal paste once a year does not mean you need to clean it just as frequently. It is advisable to blow out the laptop from dust with compressed air once a month or every two months, depending on the dustiness of the room where it is located.
If the laptop has a discrete graphics card, change the thermal paste on it just as frequently.
Replacing the thermal paste on the graphics card
For this operation, you will need a small Phillips screwdriver. No special specific knowledge is needed, just be careful and follow the instructions.
Turn off the computer and unscrew the PCI device support bracket. Support the card so it does not break the slot with its weight. Disconnect the additional power supply if provided.
Pull it out of the PCI slot. Remember, there is a latch there, designed differently on various motherboards, but it is there. Bend it with tweezers, a finger, a screwdriver, or any other convenient way.
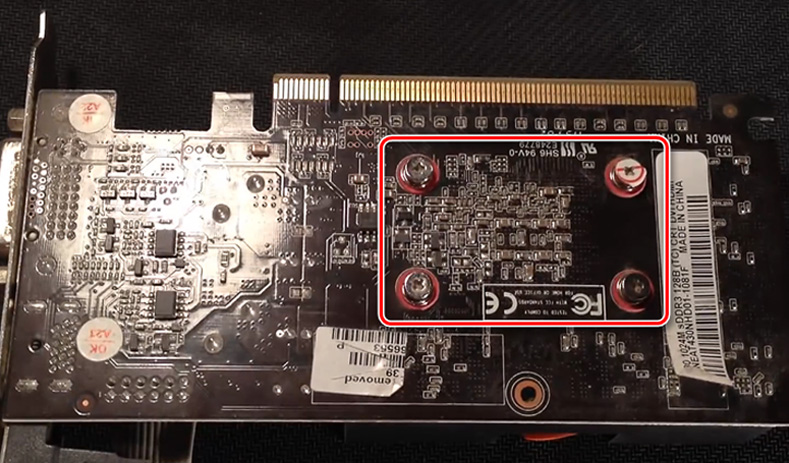
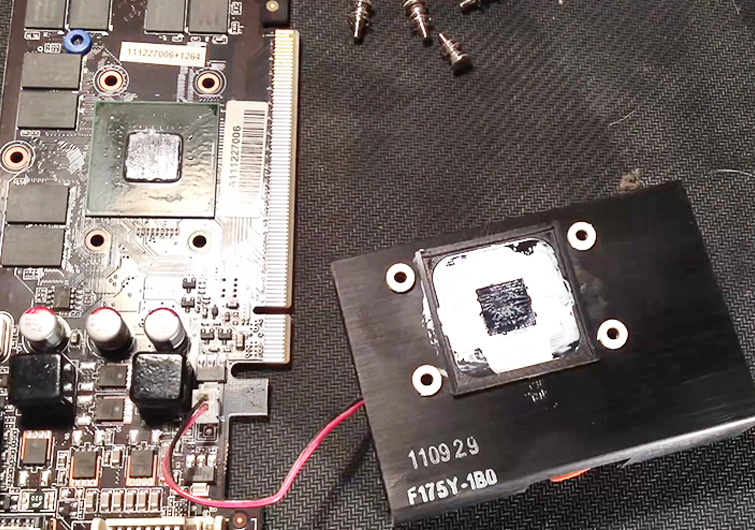
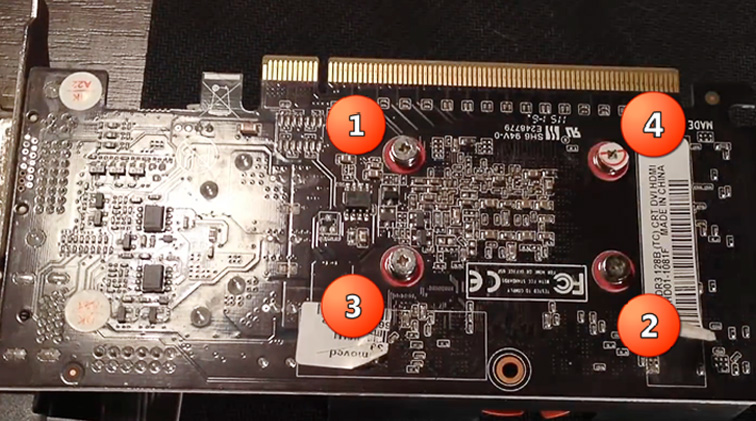
First, unscrew the radiator, which is usually secured with four screws around the chip. Be careful not to lose the springs, which serve as pressure limiters.
Now remove the radiator. Carefully! If you haven't replaced the thermal paste for a long time, it may have stuck and dried up. In this case, you have no choice but to slowly rock the radiator body to crumble the dried paste until completely detached.
In the photo, you see a dirty radiator and an equally dirty GPU crystal. They need to be cleaned, and it is best to do this with alcohol, a cloth, and a wooden stick. This way, you will not damage anything.
Apply new thermal paste to the crystal and spread it with any handy tool; you can do this with a finger wrapped in plastic wrap or use a plastic card to distribute it. Apply no more than a match head's worth of paste. Remember, it is only needed to smooth out irregularities, not as a pad.
After applying the thermal paste, screw the radiator back on. Tighten the screws in a cross pattern to keep the radiator level with the crystal. Do not overtighten; the springs are sufficient to hold the radiator firmly. It's important not to overdo it and crush the crystal.
The thermal paste replacement process is complete. You don't need to wait; immediately install it in the computer and test the new thermal paste.
Replacing thermal pads on the graphics card
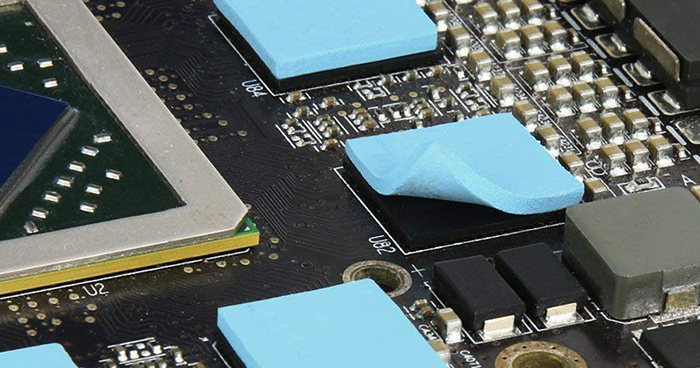
The problem with silicone thermal pads is that they come in different sizes, more precisely, thicknesses. Each manufacturer uses different pads depending on the height of the chips used. While the GPU chip always fits snugly against the radiator to maximize heat transfer, lower plastic memory modules use spacers.
You cannot fill everything with thermal paste; the gaps are too large, and it will not work. That is why thermal pads are used. They usually have a thickness of 0.5 mm to 5 mm.
How to determine the thickness of the thermal pad
To buy the right spacer, you need to place a piece of plasticine under the radiator in the desired location. Press the radiator with screws and measure the thickness of the plasticine pancake with a caliper. Unfortunately, without a caliper, this cannot be done. Except by eye, but there is a serious risk of making a mistake.
How to replace a thermal pad
If you are not satisfied with the cooling of the graphics card modules, you can replace the pad from silicone to copper or aluminum. But you will need to select the thickness very precisely. Now you can buy a whole set of plates, which is not expensive; it includes plates of different thicknesses so you can choose them for your tasks.
To replace the pad itself, see the instructions for replacing the thermal paste. After removing the radiator, also remove the silicone spacers and place your chosen replacement in their place. If you decide to use copper plates, they need to be coated with thermal paste on both sides for better contact - copper's thermal conductivity is 78 times higher than that of silicone with thermal conductive additives.
Replacing thermal paste on the processor
The CPU and GPU are limited in their frequency by the overheating temperature. The heat generated during overclocking has nowhere to go, and the standard means cannot cope with it; as a result, the temperature rises, and the device becomes unstable.
At the factory, processors are created for the loads embedded in them. But desperate users in pursuit of frequency seek ways to bypass the laws of physics and improve heat dissipation.
You can do this, for example, with the help of high-quality modern thermal paste. The most desperate extremists use liquid metal. As mentioned above, it is one of the best thermal interfaces. And it really allows for better heat transfer to the radiator. However, its use has several nuances that need to be considered:
- Due to the presence of gallium in the composition of liquid metal, it reacts with aluminum. Any drop spilled on an aluminum part of the radiator or lid will spoil it. The photo below is a vivid example of what happens if you do not follow this rule. Remember, this applies not only to radiators but also to any other aluminum part, such as a laptop lid or tool.
- This type of thermal interface is not a dielectric. Most thermal pastes do not conduct electricity, making them dielectrics. If desired and necessary, you can smear the entire motherboard with them. But any drop of liquid metal on the contacts of the motherboard will short them. For this reason, it is very rarely used for application under the radiator. Throughout its existence, it remains in a liquid state; if you apply too much, it will sooner or later start to flow down, and if this happens, it will most likely short something on the graphics card.
- Replacing this type of thermal interface is a bit more complicated than any other. Regular thermal paste is wiped off with alcohol or volatile solvents, the silicone pad is simply removed by hand, and liquid metal, after several months of use, leaves a residue on both surfaces. This residue has high thermal conductivity and does not impede heat exchange. But to apply a new thermal interface, it must be removed, even if you just want to refresh the liquid metal.
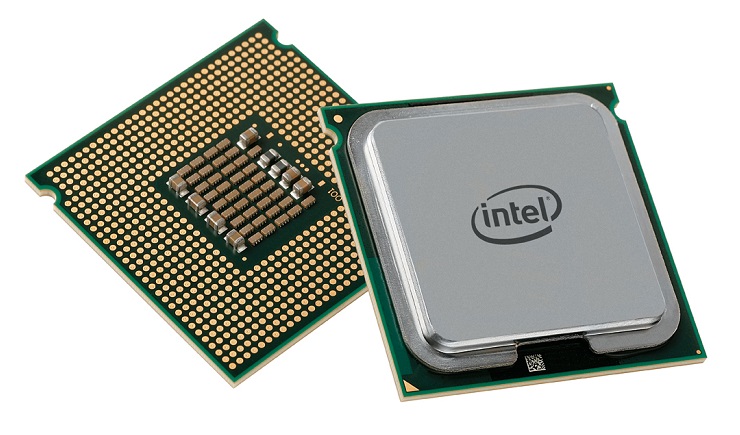
In fact, the CPU lid is just a piece of metal with good thermal conductivity. This is how you are used to seeing the CPU.
This metal lid sits tightly on the sealant and is removed using a special machine (in the photo). This is a tool for removing the lid; it shifts the lid by screwing pressure, tearing off the glue and old thermal interface. The kit also includes a pressure mechanism to fix the lid strictly perpendicular to the PCB. In this position, the glue-sealant should dry and the crystal should be pressed as tightly as possible to the heat spreader through the thermal paste or liquid metal.
The process of removing the lid is called delidding.
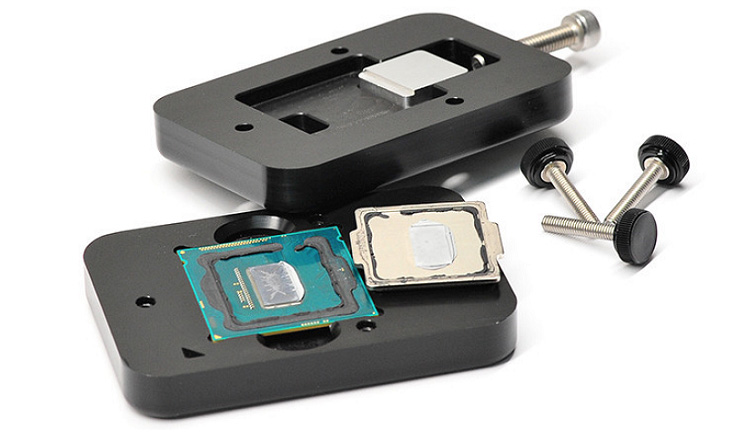
This is what the processor looks like under the lid.

Step-by-step instructions for replacing thermal paste on the CPU
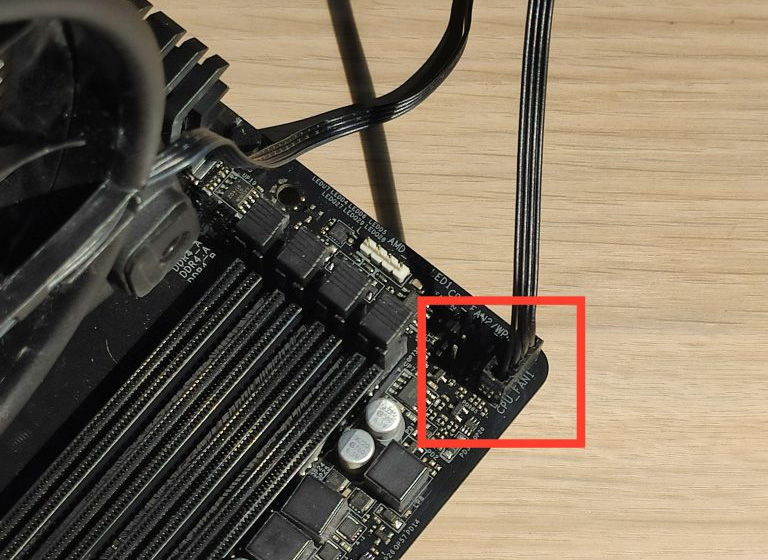
Before starting, turn off the computer and ideally unplug the power cord to avoid getting an electric shock. Before removing the CPU cooling radiator, disconnect the fan attached to it. Usually, it is connected to the motherboard from below or to the right.
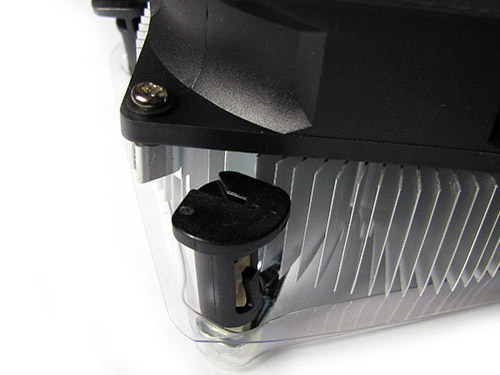
If you have an AMD processor, you will find a latch like in the photo above, which you just need to press and unhook. On the other side, it just hangs on a plastic part, and there is nothing to unhook. If the thermal paste has stuck, it will be harder to remove the radiator; you need to act carefully and not pull the tower itself but gently rock it.
If you have Intel, the latch will look like in the photo. Just turn the plastic clamps as indicated by the arrow.
In some cases, the mounting can be non-standard, for example, on spring-loaded screws. In this case, use a screwdriver to unscrew them and remove the radiator.
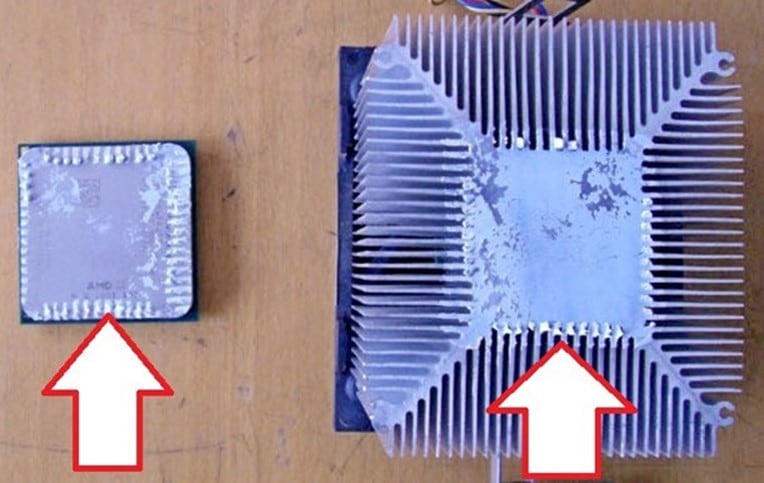
After removing the radiator, you will see this.
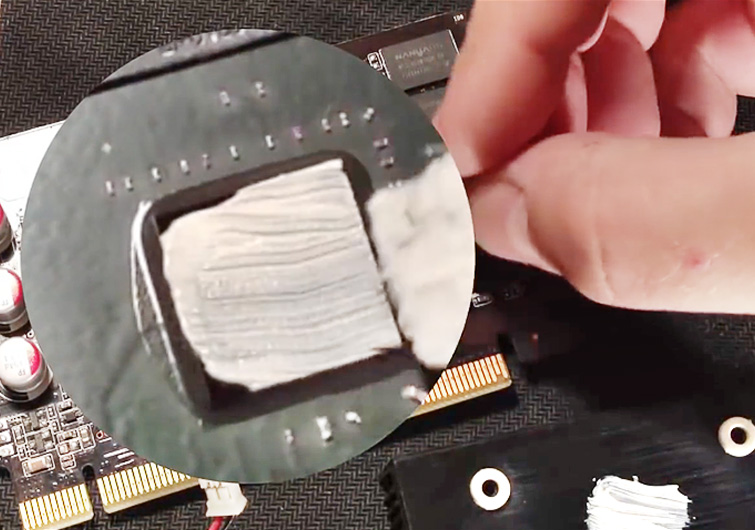
The thermal paste has dried up and is no longer effective. It needs to be cleaned off with a napkin, alcohol, and a wooden stick. After these manipulations, the surface of the CPU lid and the radiator contact surface should be smooth and scratch-free. If you do not use metal tools for cleaning, this will be the case. Use only wood and plastic to scrape off the dried paste.
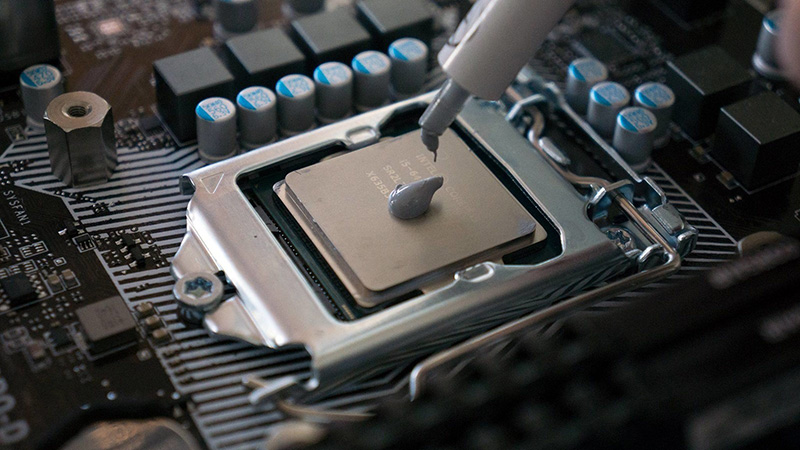
Once the surface is clean, apply a layer of new thermal paste. Squeeze out no more than a match head of thermal paste on each contact side. In some cases, if the paste is too thick, you need to squeeze out more, but remember that the less paste you apply, the better the effect.
After this, reattach the radiator the same way you removed it. You can use the computer immediately; there is no need to wait.
Replacing liquid metal on the CPU
This type of thermal interface is not cheap – 1 gram in a syringe costs about $12-15. While good thermal paste for the same price will be in a 3.5-gram package.
As mentioned above, applying liquid metal on the CPU lid is not the best idea. It does not give a significant increase in heat dissipation, but the risk of accidental short circuits increases if it leaks. Moreover, if you use a radiator with an aluminum contact area, it will be damaged.
It makes sense to apply liquid metal directly to the crystal under the CPU lid. Its use is justified only if your chip needs significant overclocking and will operate at high loads with increased frequencies, only in this case does it make sense to delid the CPU and apply liquid metal there.
Liquid metal is applied to the CPU body with a brush. In principle, it is not toxic and can be applied even with a finger.
Why delid the CPU
Regular replacement of thermal paste with liquid metal may not be very effective, and if there is factory solder, replacing such a thermal interface will work worse – solder is considered one of the best heat dissipation methods. Soldering the heat spreader yourself is quite difficult and dangerous. You need solder with a low melting point up to 135 degrees and a soldering station with a temperature controller. If you do not have such equipment, it will be cheaper to contact professionals.
If you are lucky enough to have such a set, the solder is applied after tinning to the CPU lid and the crystal itself. Then, when aligning, the lid is heated, and when the solder becomes liquid, it needs to be pressed with a special device. It is better to use thermal glue; it softens when heated, making positioning easier.
There is also the option of replacing the stock CPU lid with a copper one; there are also cooling options that mount directly to the crystal without a lid.
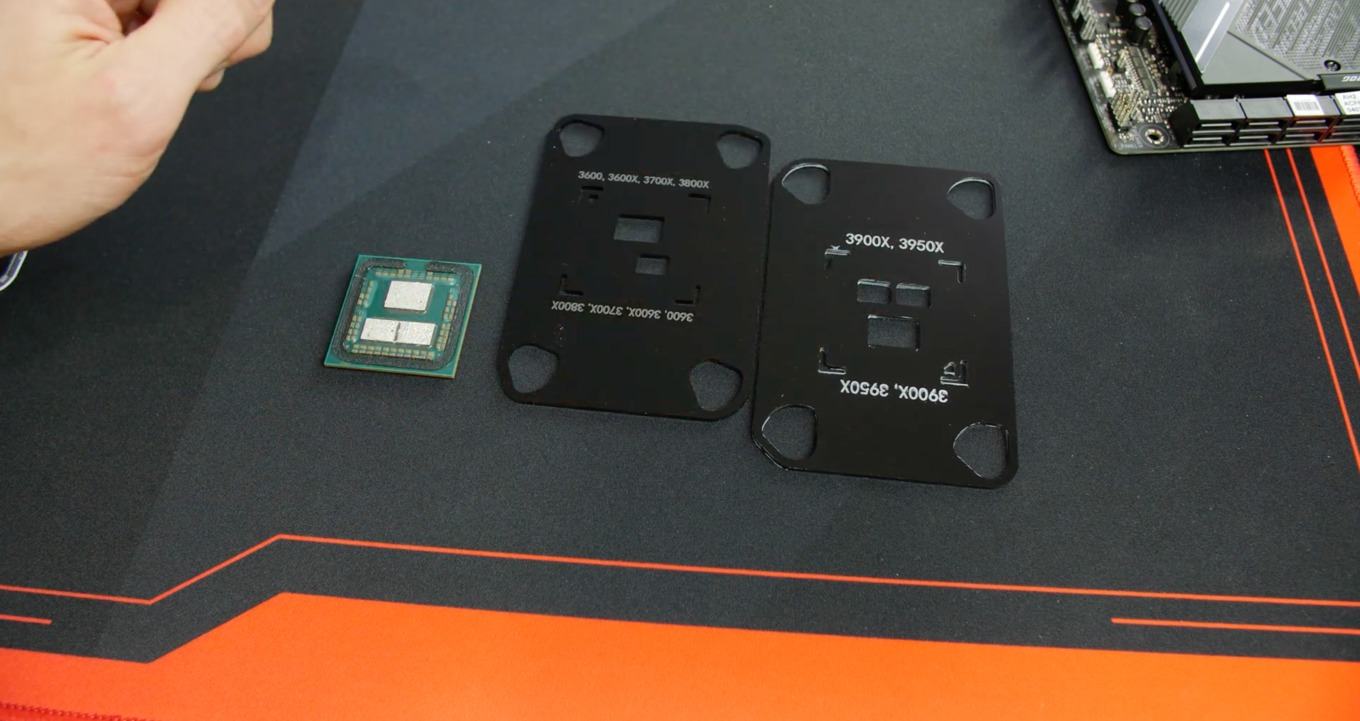
In the photo – Ryzen 3000 OC, a kit for installing a liquid cooling system directly on the CPU crystal.
There are more universal interfaces for installing a radiator on the crystal.
Installing an air cooling radiator on the crystal won't help much, and it's somewhat dangerous as they are not designed for this. A liquid cooling system handles this much better. Using a custom copper CPU lid and a liquid cooling system can significantly raise the overclocking limit and make the computer quieter, especially in demanding programs and games.
Using liquid cooling directly on the crystal is a dubious idea; it is better to use a copper lid. Copper has very high thermal conductivity and works excellently with liquid metal, and then you can place any radiator on the copper plate, whether it's air or liquid cooling.
How to remove residue after liquid metal
After removing all the liquid components with a cloth and alcohol, a solid residue will remain. It can only be polished off with sandpaper if we are talking about the radiator or the CPU lid. You cannot polish the crystal; besides, such residue does not adhere to silicon and is easily removed with a material softer than the crystal itself. This can be a wooden stick or a non-sharp piece of copper, like the tip of an old soldering iron.
Sanding is best done in several stages, starting with 400 grit and reaching the values allowed by your conditions and the availability of sanding materials in your area. Raising the grit makes sense up to 10000 grit, further polishing is not as crucial. From 1000 grit, sanding should be done through a foam pad. If you cannot find the right sandpaper, the minimum is 1000 grit. So, for full removal of liquid metal, you will need sandpaper 400, 600, 800, and 1000 grit minimum. After sanding, it is advisable to wipe the working area with alcohol to degrease it and remove dust.
Replacing the thermal paste on a laptop CPU
Replacing the paste in a laptop is no different from a computer, except for disassembling the laptop itself. There are no general recommendations here; each model is disassembled in its own way, you need to look for disassembly instructions online.

Usually, the copper heat pipe in a laptop is secured with screws. In some laptop models, there are holes for quick access to important components. In such models, thermal paste replacement, cleaning, and maintenance are quick and easy.
Laptops use thermal pads, and if you decide to replace the thermal paste, replace them too. Silicone sometimes burns out under high temperatures and starts to crumble, such pads cannot be used. If you want, you can replace them with copper or aluminum plates, which will significantly reduce the heat and noise level of the laptop. Remember that metal plates instead of pads need to be coated with thermal paste. Silicone pads do not need to be coated with thermal paste.