SSD (English: Solid-State Drive), solid-state drive, is a type of storage device used in modern electronics. SSD uses a non-mechanical method of data storage, specifically using memory chips, like in Flash drives or RAM.
Memory chips work much faster than mechanical methods of data storage.
- HDD. There is an actual disk and a laser head in the case that writes data onto it. This is faster than writing to a DVD because the disk is fixed and there are many ways to speed up reading and writing, such as using two parallel heads, etc.
- SSD. The memory chip has no mechanical parts. This makes its operation silent, and reading and writing are not tied to the speed of moving the laser head, disk rotation, or initial positioning speed. In simple terms, SSD uses chips where all data is stored by holding a charge with microscopic elements.
At first glance, this information seems useless to the user, but it implies that data on an SSD cannot be stored forever without power. Different manufacturers specify their storage times, depending on the type of memory and structural features. The longest data storage time on a disconnected drive is promised by DELL, up to 10 years. But consumer SSDs rarely hold a charge for more than 6 months.
A very important point is temperature. Increasing the chip's temperature by just 5°C halves the storage time.
! When changing the drive, do not leave it without power for a long time, as you risk losing data.
Replacing SSD
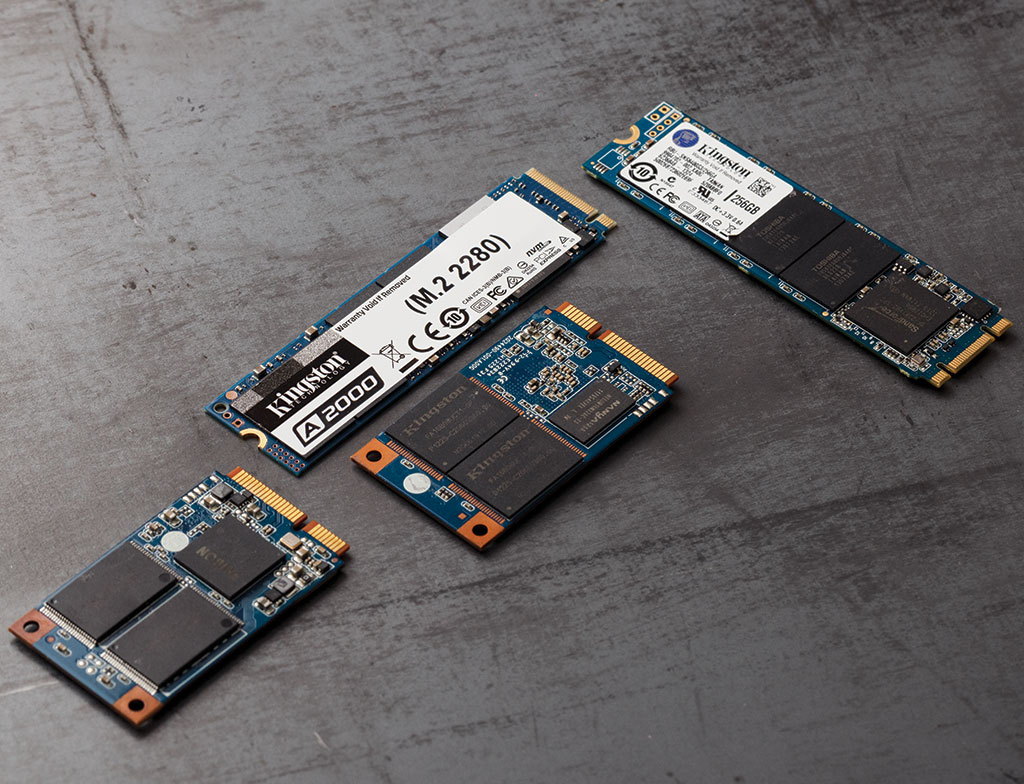
The solid-state drive is manufactured in 2.5” or m.2 format. 2.5” connects to the SATA interface, while m.2 connects via NVMe. Each has its advantages and disadvantages.
SATA
A more universal connector used by all 2.5” and 3.5” devices. This interface signal can be easily converted to USB, allowing these devices to be used as portable storage. There is usually enough space in the case for efficient cooling.
Disadvantages include the need to run cables - one from the power supply, the other from the motherboard, so you will have to work to neatly lay all the wires in the case.
The second disadvantage is the relatively low data transfer speed, up to about 500 MB/s, in rare cases reaching a record 600 MB/s. Modern NAND memory can deliver much more. No tools are required for replacement, except maybe to screw the SSD to the case, but most gaming cases now use quick-clamp systems.
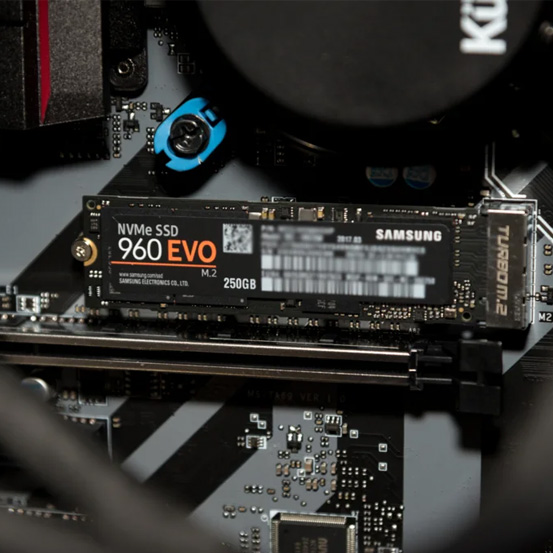
NVMe
This is a connector on the motherboard that allows reading and writing speeds of up to 3.2 GB/s or 3277 MB/s, the difference is obvious. If the motherboard has a slot for it, installing such an SSD is very compact and unobtrusive. The small SSD board is almost flush with the motherboard and requires no cables.
Disadvantages: dense layout hinders cooling, but you shouldn't focus on that - an SSD can only burn out under server loads, and they use the U.2 format, which provides more powerful cooling. Additionally, the number of rewrites for each cell is limited, especially in consumer SSDs. So it's better not to load them with torrents, HUBs, servers, and other activities that strain your storage.
The second disadvantage is that USB adapters are quite expensive, much more so than SATA counterparts and almost useless since USB 3.0 limits data transfer speeds to 425 MB/s, and USB 3.1 to 720 MB/s, comparable to SATA3 but significantly lagging behind NVMe capabilities.
You will need a screwdriver to replace this SSD, to screw the SSD board to the motherboard.
Which connector to choose: SATA or NVMe?
It all depends on the class and capabilities of your chosen model. Look at the declared data transfer speed: if it is around 512 MB/s, then technically there's no point in getting NVMe. The memory can't deliver the speed that the connection type provides. You might buy this model only for more compact placement.
Note that not all M.2 drives connect via NVMe, some use SATA2. In this case, they are not justified at all. It's better to get a 2.5” case and connect it via SATA2. But SATA3 models do not have such data transfer limitations, the connector itself allows speeds up to 6 Gbit/s (768 MB/s) - quite fast, but still far from top memory capabilities.
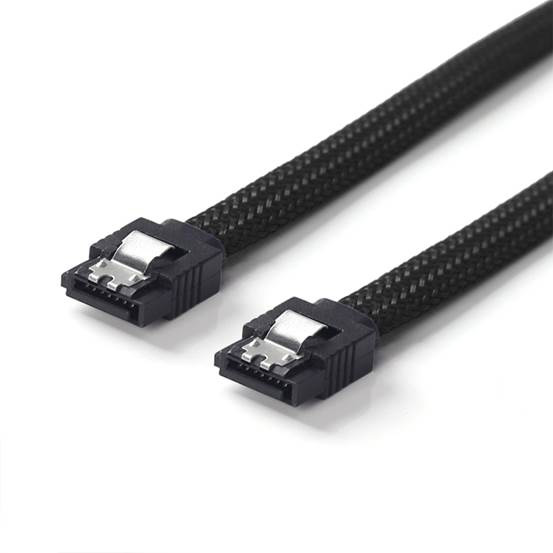
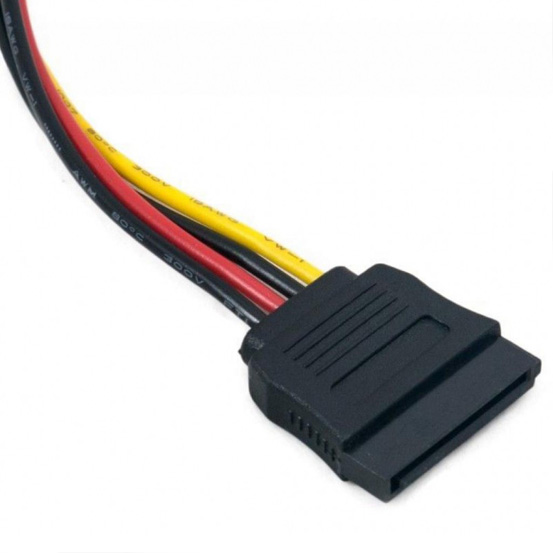
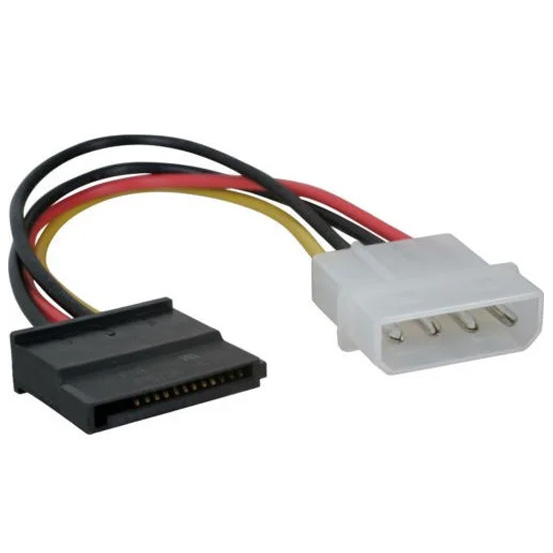
What cables are needed to connect an SSD?
What to do if there is no suitable slot for an m.2 SSD on the motherboard?
If you have an m.2 drive and an old motherboard that doesn't support this type of connection, use a PCI-e or SATA adapter expansion card.
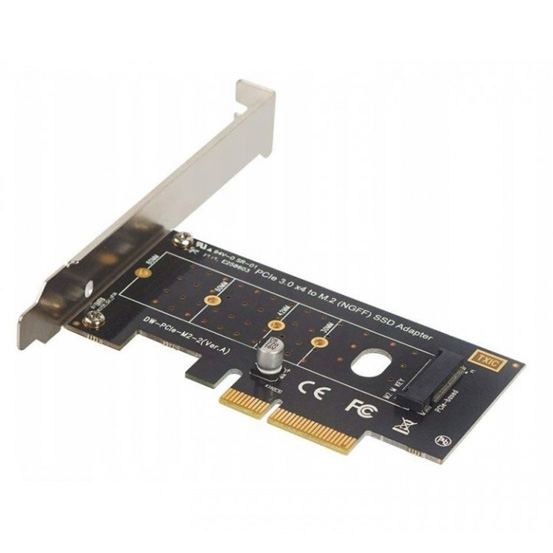
PCI-e adapter
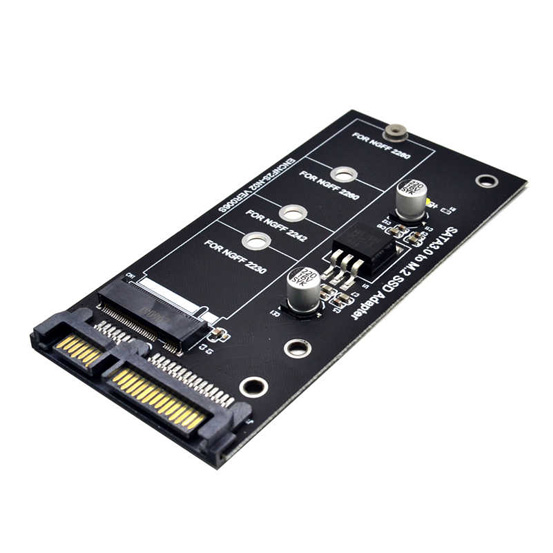
SATA adapter
Where to install the SSD in a PC
Let's examine the installation of SSDs with three different types of connections, divided into two groups - full-size 2.5” and compact m.2.
How to install a 2.5” SATA SSD
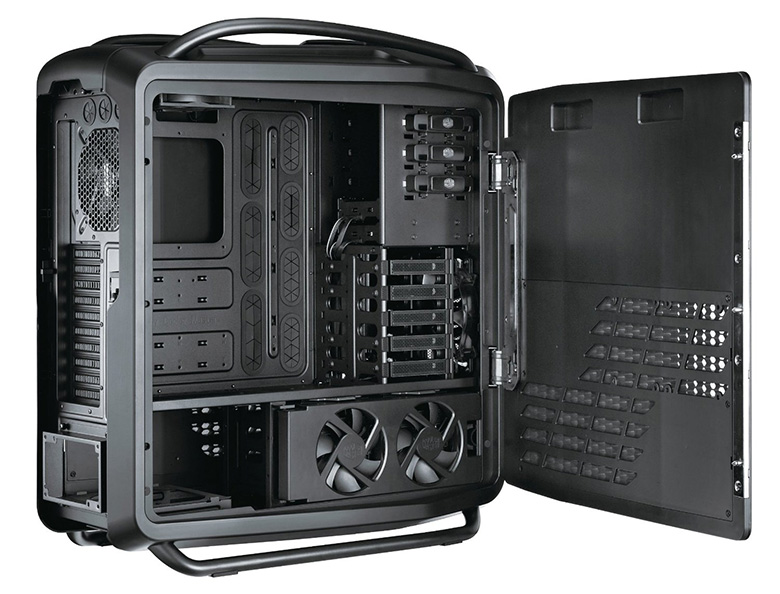
Almost all cases have the SATA drive bay at the front. The picture shows a case with side access to the drives, sometimes they need to be inserted from the front or the motherboard side. The bay adjacent to the front part is where the SSD should be installed. There are 3.5” and 2.5” slots there, sometimes a 2.5” slot uses an adapter or plastic limiter to fit the device tightly.
The SATA connector on the motherboard looks like the one shown in the picture. Different colors indicate the connector version. SATA3 is faster, SATA2 is outdated but supports more devices. They are interchangeable, but if you plug a SATA3 device into a SATA2 connector, it will work slower.
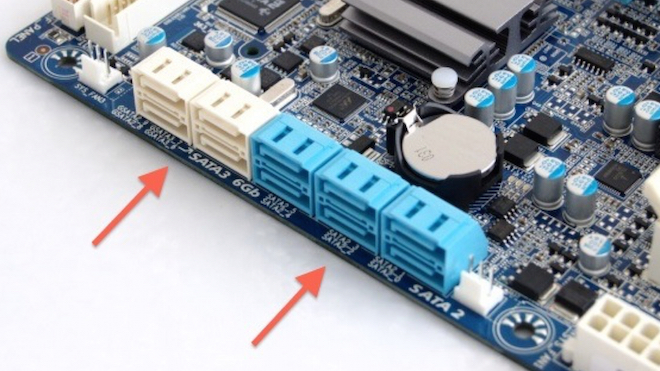
The picture shows a closed connector type. There are also open ones, where the plastic does not completely surround the contact tracks – this is just a design feature, they work no worse.
Note that small numbers are written next to each connector, this label is present on every motherboard. If you remember which connector you plugged what into, you can easily choose the boot priority in BIOS or UEFI. This will be especially useful if you use two drives from the same manufacturer. Their technical names usually look like this: "SAMSUNG a bunch of numbers and letters." They are not random, they indicate the model, capacity, and type of drive, but to avoid figuring out these codes, just remember where you plugged each drive.
Now, when you have found the SATA connector and connected the corresponding cable, plug it into the drive itself. As you can see in the picture below, there are two plugs, they are different, you can't mix them up. The narrower one comes from the motherboard, and the wider one from the power supply.
After connecting, proceed to the startup and setup.
How to install an NVMe m.2 and SATA SSD
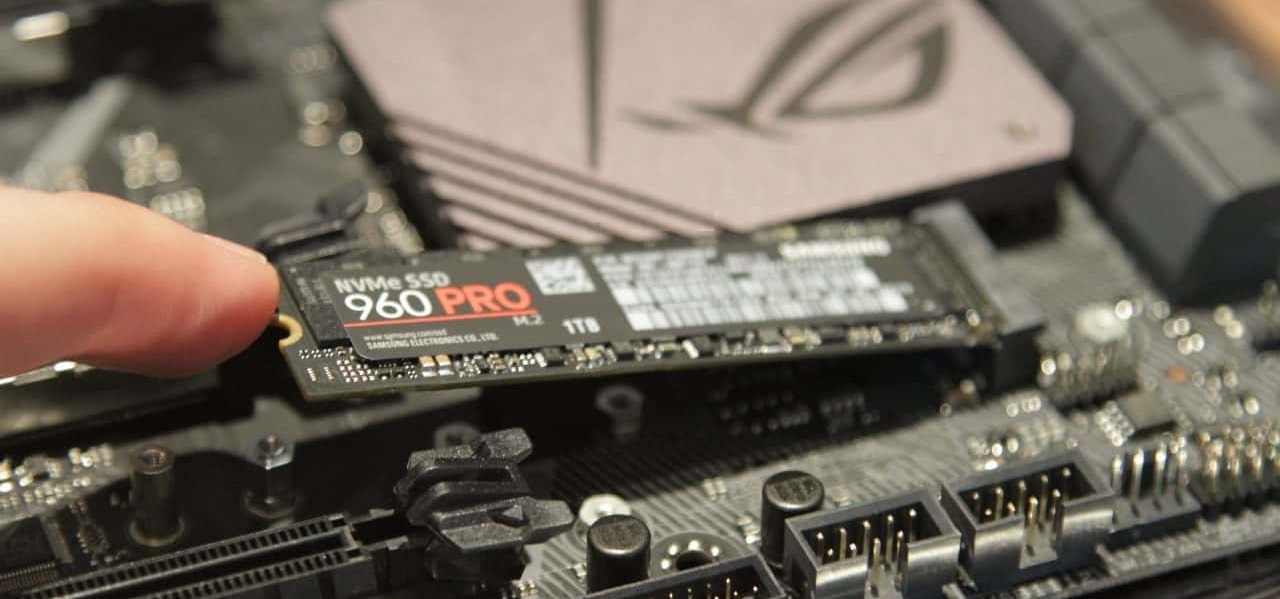
To better understand the mess with connectors, look at the picture.
The AHCI slot is not of interest, it's outdated and almost unused now, replaced by NVMe. The arrows in the picture below clearly show that a SATA (M, B) device can be easily inserted into NVMe and will work, but a modern NVMe (B) cannot be inserted into SATA physically, so don't worry, if you don't apply force, you won't break anything.
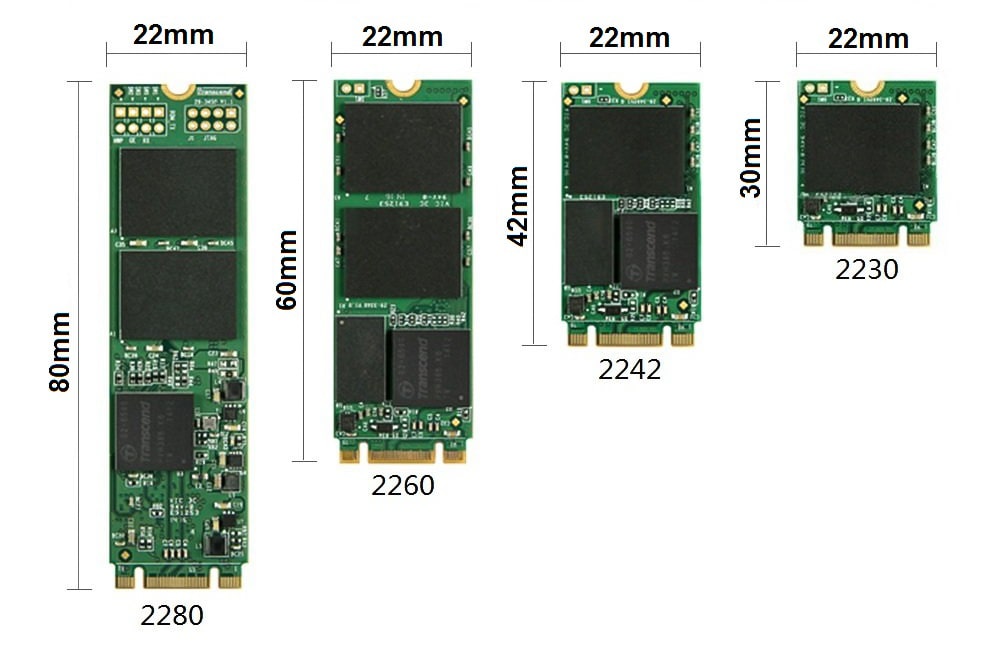
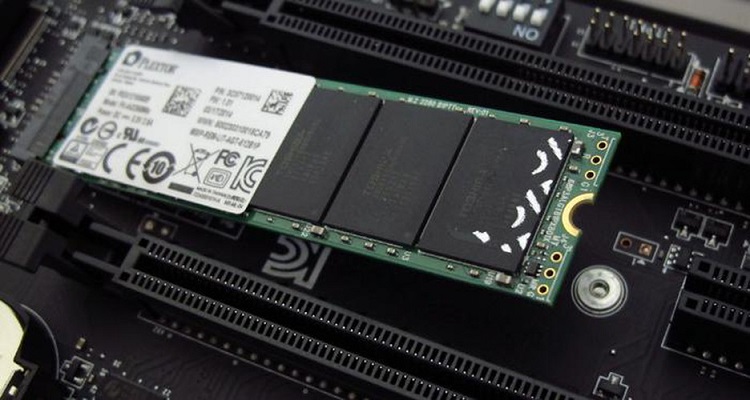
The second point is the length of the board. There are 4 standardized sizes, the most popular is 2280, the largest of the presented ones. The size hardly affects the technical aspect, only the position of the bolt on the motherboard where you will screw it in.
To determine what slot you have, you can read what is written next to it in small letters on the motherboard. The second option is to refer to the technical specifications of the motherboard itself.
The last step is the simplest. Unscrew the screw from the motherboard, place the SSD in its spot, and lightly secure it with the same screw you removed 5 seconds ago. After these operations, you can proceed to the setup.
Replacing HDD with SSD in a computer
It is not recommended to replace HDD with SSD, it is better to install two drives in parallel. If we are talking about a laptop, then the space inside the laptop limits you. A desktop computer in any case has enough space to install 2, 3 or more drives.
The main thing is to put the system, games, and programs on the SSD, and leave the HDD as a sort of storage for everything you don't need that often. These can be photos, movies, series. HDDs handle torrents easily, aren't afraid of a large number of rewrites. SSDs, in this regard, are like sports cars - very fast, pleasant to use, but less reliable compared to the old good mechanical devices.
It's not that SSDs are prone to constant breakdowns and data corruption, no. Even the cheapest solid-state drive will delight you with high speed for many years. But it's better to be cautious with it.
How to install HDD and SSD simultaneously
The instruction for installing an SSD is above, installing the second device is no different from the first. You will simply have two drives connected next to each other. It doesn't matter in what order you connect them or which slot numbers the SATA cables are plugged into. The main thing is to set the priorities correctly in BIOS or UEFI.
If we are talking about m.2 devices, then only SSDs are produced in this format, HDDs are only available under SATA. So, in this regard, you won't have competition for space on the motherboard.
It's not that SSDs are prone to constant breakdowns and data corruption, no. Even the cheapest solid-state drive will delight you with high speed for many years. But it's better to be cautious with it.
How to install SSD in an old computer
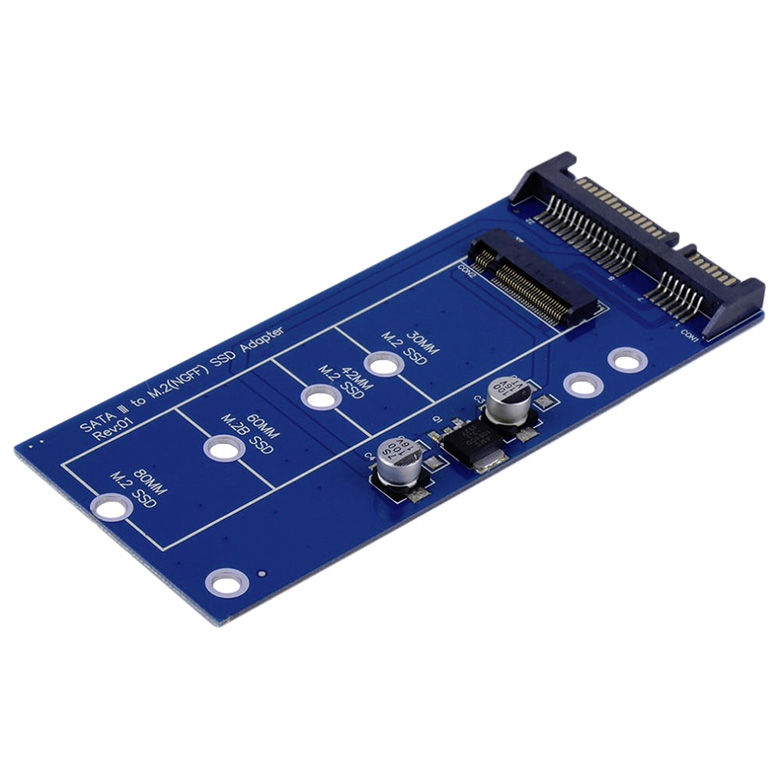
Old motherboards lack slots for m.2 SSDs. To install one of them, there is only one option – buy an adapter. m.2 drive adapters come in two types - those that connect to SATA connectors and through the PCI-e slot.
SATA adapter
The photo shows a very simple model without a plastic case, backlighting, and other decorations. They are usually made simpler, as owners of top-end PCs usually have corresponding slots on gaming motherboards.
You need to place your m.2 drive in it and connect it to the computer like a regular SATA device.
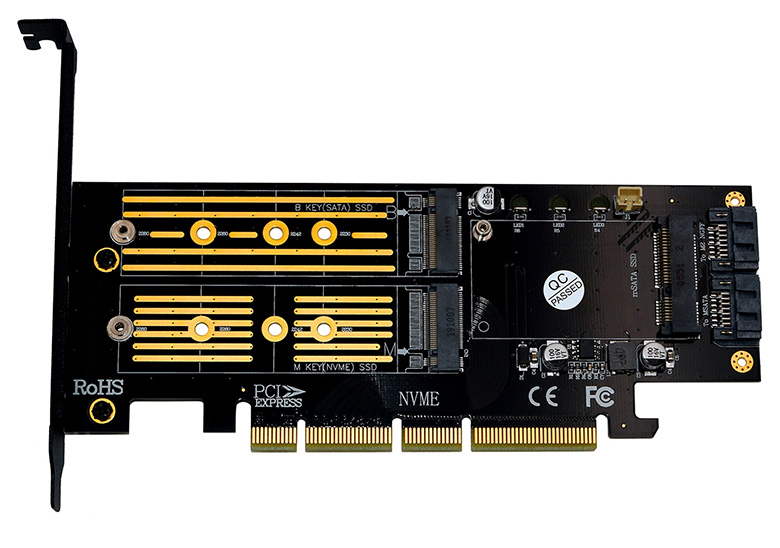
PCI-Express Expansion Card
The picture below shows a simple card that allows you to connect both SATA and NVMe SSDs in m.2 format. The range of such cards is quite wide and ranges from very simple ones to very expensive ones that allow you to connect up to 4 SSDs.
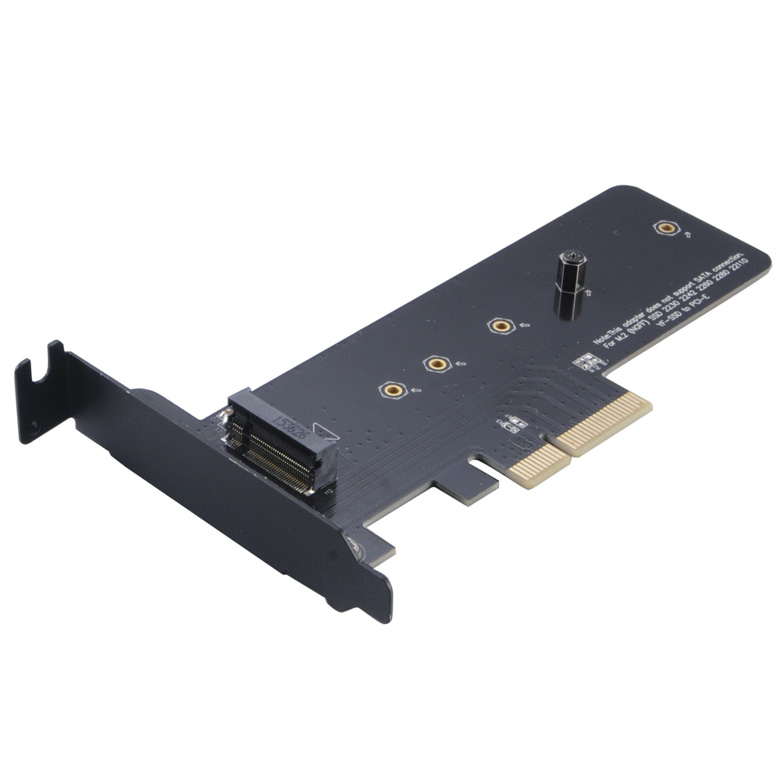
Installing such a card is not difficult, but due to the design of your case, it may take a few minutes. Usually, all PCI-e cards are pressed by a bracket on the side to reduce the load on the motherboard. This includes your graphics card. Make sure the card does not block the required slots and gently release the pressing bracket. Be sure to support the graphics card - if it's heavy, it can rip the slot out of the motherboard under its weight.
After installing the adapter, insert your m.2 SSD into it. You can do this before installation, it doesn't make any difference. The only exception might be adapters with additional drivers. It's better to install them "bare" first, and after driver installation is complete, turn off the computer and install your SSDs.
How to Install PCI-e SSD
There is a separate type of SSD drive, it is quite expensive, and more often used in servers. Such drives are also used as a premium solution in gaming computers.
How to Install SSD on the Motherboard
Find the connectors for m.2 form-factor devices. They look the same on all motherboards, except for decorative covers.
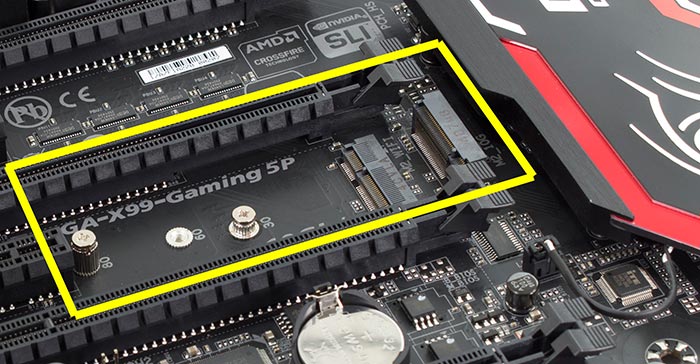
You just need to install the board into the slot and secure it with a screw.
You may encounter a problem with installation if this slot is under the graphics card. Naturally, it needs to be removed to see it. But the problem may be with the cooling radiator not fitting with the protruding SSD board. In short, the board might not fit or the graphics card won't fit properly after it.
In such a case, look at the adapters and connectors section. You can also move the graphics card, but there might be issues - most boards, even gaming ones, have only one PCI-e 4.0 x16 slot. You can place it in another slot, the third version, but the card's performance will decrease. If you are choosing a motherboard now, look for those where the slot for m.2 devices is located away from the PCI-e slots.
How to Properly Install SSD in a Laptop
If you have an old laptop without a slot for installing m.2 SSD, a 2.5” SSD will help. Almost all laptops use 2.5” drives, these can be HDD, SSD, or SSHD. Two slots are rare, usually, there is one and it's best to occupy it with one large-capacity SSD.
In newer models, a slot for m.2 devices is already provided, and installing the drive there is not difficult even for those far from technology. The main thing is to get to the board and the necessary places.
Some manufacturers provide a quick access hatch to the RAM, Wi-Fi/Bluetooth module, and drive. If you bought such a model in due time – you are lucky. You will see something like this there.
As you can see, the entire right part of the case is occupied by a quick-release cover for accessing the necessary parts of the laptop. Under it, you will find your HDD, RAM, Wi-Fi/Bluetooth module. You just need to carefully inspect where the screws are to avoid breaking anything. And act very carefully.
Replacing HDD with SSD
The SATA connector for the 2.5” form factor on all laptops is the same as on desktop PCs, only combined. Your task is to remove the HDD and screw the SSD in its place. More precise recommendations cannot be given, as the construction of different laptop models varies greatly.
If your laptop doesn't have quick access to the hard drive, you will have to remove the entire back cover, which takes longer and requires certain skills. Find a video on the internet about disassembling your laptop model and follow the steps of the master – this is the only adequate way to disassemble a laptop without experience.
Most likely, you will need a knife or a plastic card to pry the latches and a magnetic screwdriver, usually nothing more is needed.
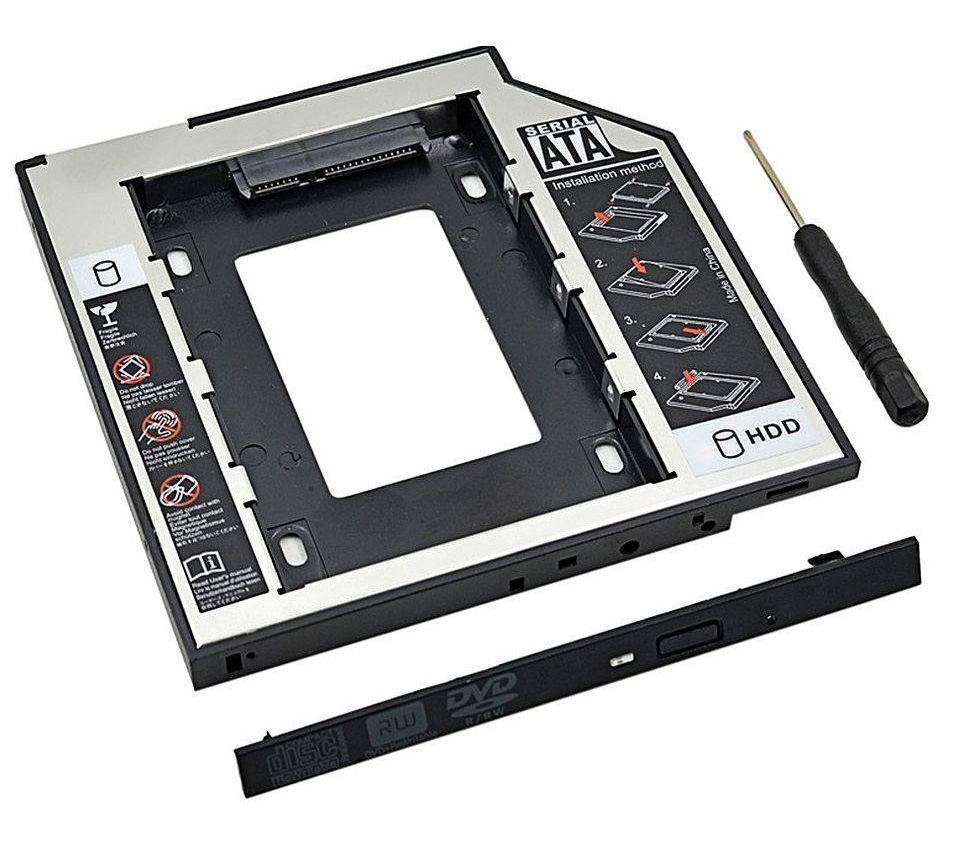
How to Install a Second Drive if There is No Space for It
If your laptop has a DVD-ROM, you can give it up in favor of a second drive. The connectors are the same, but sometimes this module connects via a shortened SATA variant. In any case, you can't install a hard drive without a mount, so you will need to buy an adapter.
It's inexpensive, securely attaches to the case with your new SSD, and fully protects it from external influences.
The only downside is that you won't be able to use disks. But considering they are becoming obsolete in 2021, it's much easier to buy a USB DVD-ROM.
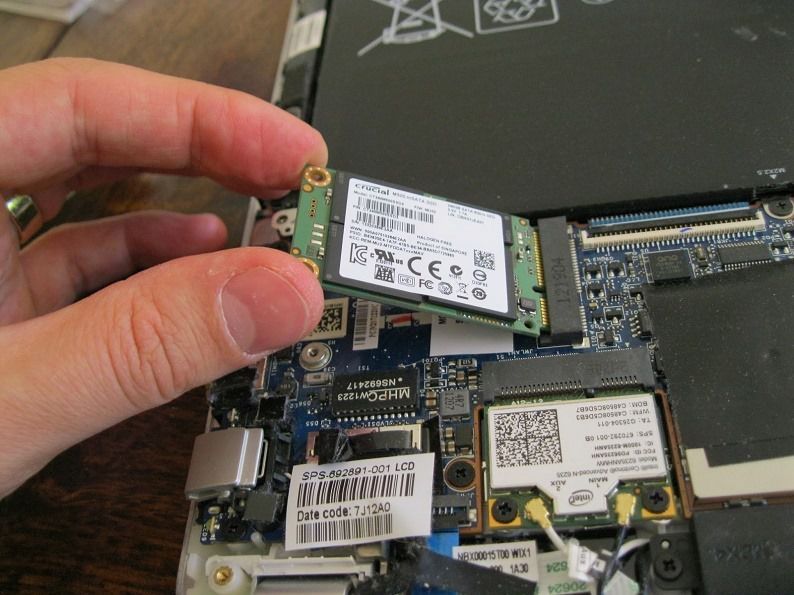
How to Install SSD mSATA on a Laptop
The reduced SATA connector (mini SATA) was created by INTEL to increase buffer memory on motherboards with their processors. Now it is used to connect SSDs. Such solutions have high speed as they were created for much more demanding tasks.
Installing an mSATA SSD is no different from installing any other m.2 device. Two simple steps - insert it into the slot and secure it with a screw.
Can You Install Games on SSD?
Definitely transfer all your games to the SSD. They will launch instantly, and the loading of saves will be reduced to a few seconds.
Here's why. In games with high-speed movement and an open world, the environment loads gradually as you approach it. For example, in the GTA series, you might have had problems with this while playing on an HDD. The character models and surrounding world were blurry and low-poly. Your old drive simply couldn't load textures and models fast enough because you moved too quickly on a plane, helicopter, motorcycle, race car, etc.
Can You Install Windows on SSD?
You can and should, you will see a significant increase in computer startup speed, programs will start and work faster. You will notice the difference even if you choose a budget SSD model.
How to Install Windows on SSD?
Installing the operating system on an SSD is no different from installing it on any other drive. You will need a flash drive with a Windows 10 x64 installer and 20 minutes of free time.
You need to enter the BIOS. BIOS or UEFI is the operating system embedded in the motherboard. It has limited functionality and is only needed to configure computer components before Windows starts.
To enter BIOS or UEFI, you need to press a specific key or key combination immediately after starting the PC but BEFORE Windows loads. This combination is shown on the boot screen for just a few seconds. Most often, this is the DEL key, but in some cases, it can be F2, F9, and for laptops sometimes ESC works. The easiest way is to enter your laptop model into Google and ask how to open BIOS. If you're lazy, see the table below.
| Manufacturer | Key |
|---|---|
| ASUS | ESC |
| ASUS Phoenix-Award | F8 |
| Acer | F12 |
| Dell | F12 |
| Fujitsu | F12 |
| HP | ESC, F9 |
| Lenovo | F12 |
| MSI | F11 |
| Samsung | ESC |
| Sony | F11 |
| Toshiba | F12 |
| Motherboard Manufacturer | Key |
|---|---|
| ASUS | F8 |
| AsRock | F11 |
| BioStar | F9 |
| Gigabyte | F12 |
| Intel | ESC |
| MSI | F11 |
Once you are in the BIOS, you need to find the section where you can set boot priorities. Set the first priority to the flash drive with the Windows installer, the second should be the SSD, and then the rest of your devices.
Some systems use a separate checkbox for booting from a flash drive, something like "Boot from Flash drive?". Check the box there. If this is your case, you will not find your flash drive in the boot priority list – this is normal.
After restarting, you will boot from the installer, where, following the instructions, you can easily install Windows.
How to Partition a Disk When Installing Windows
First, choose the full installation option, not an update.
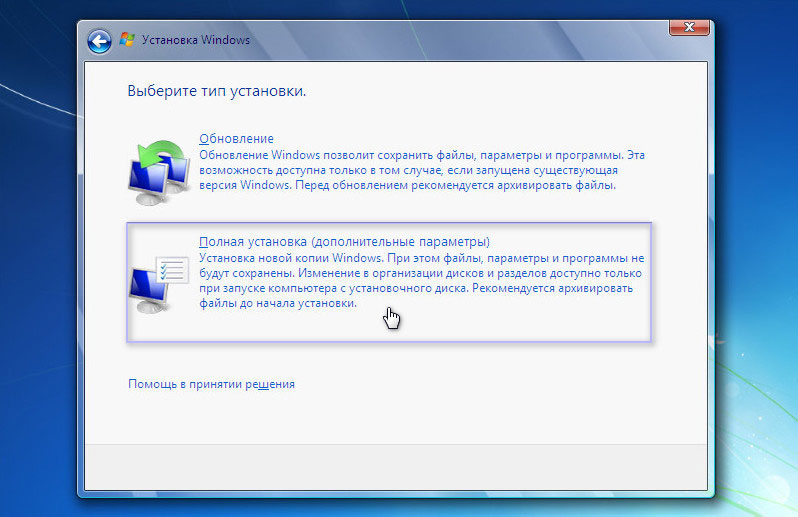
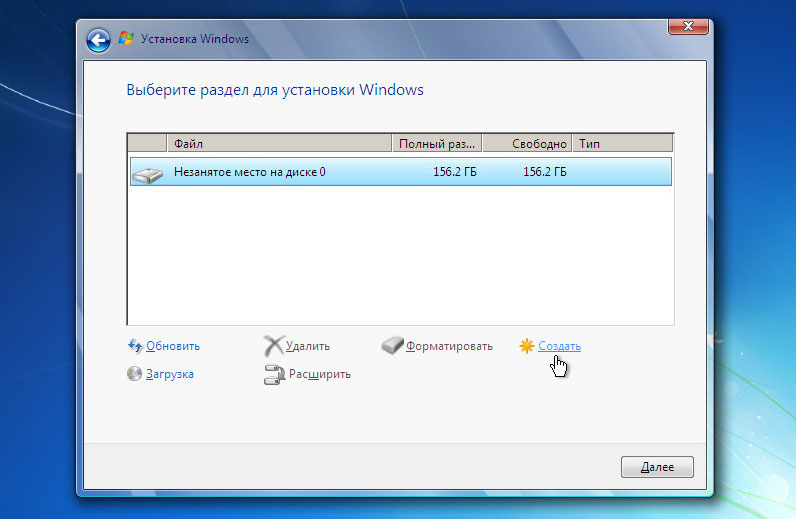
You will see something like this (screenshot below) if there is only one drive in the computer. If there are several, all marked volumes will be listed. You need to click "Disk setup" for a new SSD.
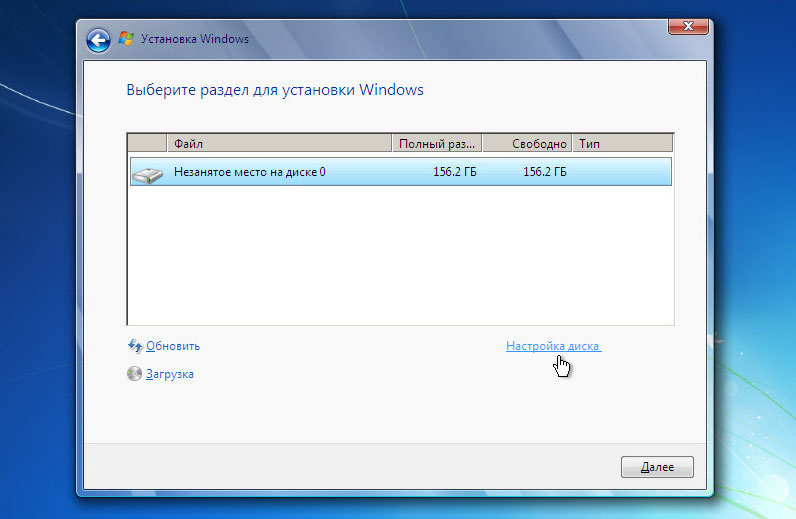
New control buttons will open, and with the "Create" button, you can create a volume, in Explorer they are called local disks, it's the same. Allocate space for the system disk C, and then for the others. It's best to partition as shown in the table below. The values in the table are approximate, usually, the capacity in drives is indicated approximately, part goes to system needs, part to the SSD's own files, so the volume of the last disk will not always be a whole number.
| Drive Capacity | System Disk C | System Disk D | System Disk E | System Disk F |
|---|---|---|---|---|
| 250 GB | 50 GB | 200 GB | ||
| 500 GB | 100 GB | 400 GB | ||
| 1 TB | 200 GB | 400 GB | 400 GB | |
| 2 TB | 250 GB | 750 GB | 500 GB | 500 GB |
| 4 TB | 400 GB | 1.2 TB | 1.2 TB | 1.2 TB |
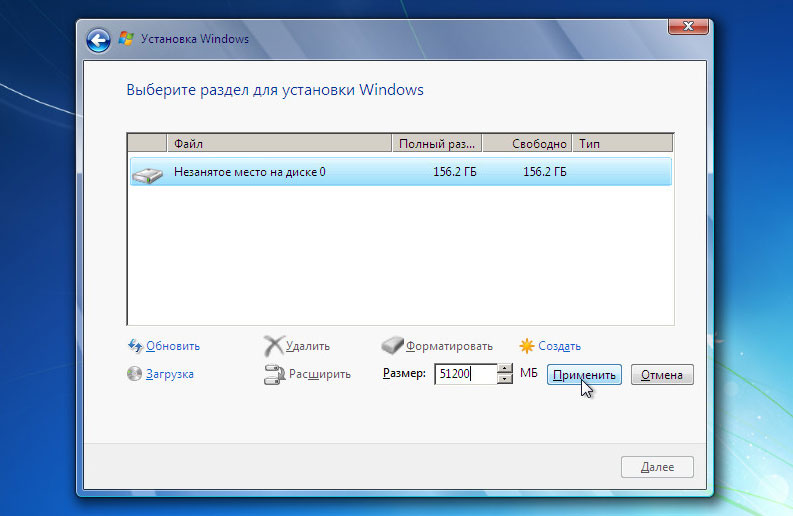
Click "Apply" and the space will be partitioned. Click on the "Unallocated space on disk 0" bar and partition until it is fully allocated. After that, all disks need to be formatted. You can do this manually, the system disk will be formatted automatically before installing Windows. The other disks can be formatted already in the installed system.
Do not use full (deep) formatting for SSD, it's pointless. It's about the way HDD and SSD work. When you delete a file from an HDD, it physically remains there, but the system no longer sees it and considers that space free. Next time you want to write a new file there, the drive will just overwrite it. It's similar to a field, you plant there, and when you need to plant new ones, you uproot the old ones, and full formatting is like a tractor plowing the entire field, making it an even, homogeneous surface.
The data storage principle of an SSD drive is different, no physical files are saved after deleting their records. Therefore, formatting makes no sense, each memory cell just remembers the 1 or 0 command, and when you delete a file, this memory cell immediately resets the set parameter.
Replacing SSD with System Transfer
To avoid reinstalling programs and transferring local game saves, you can simply copy your system disk to the SSD. Simple file transfer won't work, you need to make a copy using third-party programs. There are many free programs with this functionality:
- Acronis True Image (WD, SanDisk, Kingston, Crucial, A-Data)
- Samsung Data Migration
- Macrium Reflect
There are enough of these utilities, not all of them are free, some can be pirated, some cannot, it's up to you to choose. No instructions are provided, as all these programs support the Russian language, except Macrium Reflect, but to understand it, you need to know basic English.
Before running the program, you need to partition the free space of the new SSD into volumes. Detailed instructions are provided above in the section "How to partition an SSD drive from the Windows 10 system?"
Recommendations for Using SSD
Here are some tips that will help you maintain the performance of your device for many years.
- Do not download Torrents to the SSD. Frequent access to memory cells and file rewrites can lead to rapid wear. It's not about the program itself, but the point where the files will be saved.
- If possible, do not assign the SSD as a cache storage. Cache or temporary files are used for a short period and then deleted and replaced by new files. This leads to wear.
- Do not overheat the SSD. It should be installed in a case with good cooling. It doesn't need a separate fan if your case has an airflow setup.
- Do not defragment the disk too often. This is a killer process for SSD – massive data relocation.
- Use only Windows 10 for SSD. Earlier versions of Windows do not support the TRIM command. This reduces the drive's performance and creates a threat that your deleted files can be restored.
- Do not fill the SSD to 100%. Due to the nature of its work and access to memory cells, such a drive will work faster if it has at least 20% free space. This is about the total space on the drive, not on each separate partition.
- Format disks only with quick formatting. This is explained in more detail above.
- If you have a small-capacity SSD, do not store large files on it. For example, a music collection can easily be saved on an HDD. The listening experience won't change.