In recent years, HDDs have faced strong competition from SSDs. But the most rational approach to building a computer is to use a combination of these devices. SSDs are for programs, the system, and games, while HDDs are for storing large amounts of data. This way, you don't have to overpay for large SSD volumes, and the system will still work very quickly.
HDD - hard disk drive, uses a thin disk made of solid material to record data. This is a prime example of non-volatile storage. If an apocalypse happens, the information on it can be read even after 100 or 200 years. Currently, it is cheaper than SSDs, costing 2-3 times less per gigabyte.
SSD - solid-state drive, uses memory chips for data storage. They require energy to retain data. A normal SSD holds information for six months to a year, a good one for years, and a bad one may only last three months (limited by the capacity of capacitors or batteries supporting the saved information).
How to Choose an HDD
Before installation, you need to check the compatibility of your chosen hard drive and system. This is not about hardware compatibility but about the speed, so it does not become a bottleneck, preventing a good build from accelerating and constantly waiting for data loading.
Manufacturer
There are many manufacturers, but the leading positions are held by Western Digital, Hitachi, Samsung, and Seagate.
WD products are divided into groups by purpose:
- Blue. This series is designed for those who want to store large amounts of data passively, without constant rewriting.
- Green. Created to minimize energy consumption, they belong to the budget segment and work quite quietly. Usually, the rotation speed does not exceed 5400 RPM.
- Black. For users who constantly work with large amounts of data. It features a dual-core chip controller that significantly speeds up data writing and reading.
- Red. Designed for use as a remote network storage. The technology set allows them to work under load 24/7. They are not very suitable for desktop PCs as they have automation that turns off power if the drive is not used for a long time.
- Purple. These HDDs are for surveillance systems, capable of writing up to 64 data streams simultaneously and working year-round without downtime. Low noise and energy consumption complement the picture of an ideal recorder. Again, not suitable for desktop solutions: many degrees of protection, capable of working in extreme conditions – this is quite expensive but completely useless in a regular PC.
- Gold. Premium server HDDs, with maximum durability, capable of handling multiple simultaneous requests. They use an improved dual-actuator system for fast and accurate laser head positioning.
- Re (RAID edition). A special series for RAID arrays, supporting hot swapping, resistant to increased vibrations both external and internal. Protection is provided by RAFF and STABLETRAC technologies. As the name implies, these drives are best suited as a backup storage, with better heat resistance and incredible wear resistance.
- Se. These drives are a simplified version of the Re series. They are designed for RAID arrays up to 12 drives. Despite being budget models, they use TLER error correction technology.
As you can see, there are many subtypes. They are described here so that you understand that when choosing, you need to base your decision on your needs. Currently, Western Digital is losing ground in the home computer segment, with Seagate leading in reviews. Seagate drives are used in gaming computers from HYPERPC.
Seagate has fewer product lines, but their products are more geared towards gaming PCs:
- BarraCuda. The company's hallmark, which entered the European and CIS markets many years ago. Universal drives with high reliability and capacity. There are 2.5" and 3.5" versions with different thicknesses for any case. Pro versions are suitable for workstations and professional gaming computers.
- FireCuda. Hybrid SSHD drives that combine SSD and HDD in one case, suitable for small cases or budget savings. Frequently used data is cached in fast Flash memory, while the main array of files is stored on the disk part.
- IronWolf. A great choice for NAS storage systems for small and medium businesses. They have vibration sensors, allowing them to be used on large server racks with many drives. The manufacturer's software includes monitoring and control functionality.
- SkyHawk. Hard drives for video surveillance, reliable, allowing recording from multiple sources, consuming minimal energy, ready to work 24/7. The AI series is designed for video surveillance systems with artificial intelligence.
Interface
All modern hard drives are connected via SATA, differing only in version and corresponding bandwidth:
- SATA I – 1.5 Gbit/s, effectively 150 MB/s
- SATA II – 3 Gbit/s, effectively 300 MB/s
- SATA III – 6 Gbit/s, effectively 600 MB/s
They are backward compatible, meaning a higher version HDD will work on a lower version SATA. So, if you have a SATA 3 HDD or SSD, they will work on SATA 1 and SATA 2. But the other way around – no. Lower version SATA HDDs will not work on a higher version slot. There are exceptions to this rule, so check the technical documentation before purchasing.
Form Factor
Drives are divided into two types – 2.5" and 3.5". The former are more compact and used in laptops, while 3.5" is a solution for stationary systems. But you can install any hard drive in your computer, the connectors are the same. Moreover, due to the widespread use of SSDs, 2.5" device mounts are available in any modern case. And almost all are made in this form factor.
But keep in mind that 2.5" HDDs are designed for laptops. This involves many restrictions, such as lower energy consumption, which is a plus, but also lower spindle speed, slowing down the device. In short, if you have the option to install a full-sized hard drive, it's better to choose that.
Capacity
This is the most individual parameter, varying from user to user. Some people are content with 120 GB for a browser and office programs, while others love to play games, and their library barely fits on a 6 TB drive. To be specific, check how much space popular games require.
- Dark Souls Remastered – 7 GB
- Forza Horizon 4 – 90 GB
- Assassins Creed Valhalla – 74 GB
- No Man's Sky – 10 GB
- Mount & Blade 2 Bannerlord – 60 GB
- Crysis Remastered – 21 GB
- Iron Harvest – 30 GB
- Civilization 6 – 7 GB
- Watch Dogs Legion – 92 GB
- Far Cry Primal – 20 GB
- ARK Survival Evolved – 250 GB
- Black Desert – 55 GB
- Playerunknown's Battlegrounds (PUBG) – 30 GB
- For Honor – 40 GB
- Total War Three Kingdoms – 36 GB
- Red Dead Redemption 2 – 150 GB
- Cyberpunk 2077 – 70 GB
- Outriders – 70 GB
Some modern games still do not require large volumes for storage, but games like ARK or the much-hyped Red Dead Redemption 2 occupy 250 and 150 GB, respectively. Moreover, to handle such data volumes without freezes, you need speed; it's advisable to choose hard drives with high read/write speeds (though for games and programs, it's better to use SSDs).
As for general recommendations on hard drive capacity, they can be formulated as follows:
- 250 GB SSD + 500 GB HDD – a minimal option for games and work, suitable for entry-level computers.
- 250 GB SSD + 1 TB HDD – an optimal option but far from comfortable; too small SSD, but the HDD is enough for a reasonably large game collection.
- 500 GB SSD + 1 TB HDD – an excellent option for any mid-level computer, whether it be a work or gaming machine. Good memory reserve and the ability to speed up all used programs thanks to a fast solid-state drive.
- 1 TB SSD + 2 TB HDD – a very high memory reserve, allowing storage of large volumes of data on the HDD and a considerable game collection on the SSD. Well-suited for streamers and gaming bloggers.
- 2 TB SSD + 6 TB HDD – one of the best options, which can be expanded with a second SSD to speed up some programs requiring temporary cache files. In this case, the additional SSD acts as a storage for cached files. A huge space reserve on the HDD will allow storing very large data volumes.
Why is there less memory on the hard drive than stated?
Blame ruthless marketing. When the manufacturer indicates the number of gigabytes on the drive, they divide the number of megabytes by 1000, supposedly making it easier for the user. But we know that there are 1024 megabytes in one gigabyte. Our computer also knows this and shows us the correct amount of memory.
The second point is Windows system files and the hard drive itself. All this can consume a few hundred megabytes.
This is a normal situation, all HDD manufacturers work this way. Just keep this in mind when choosing a drive.
Spindle Speed
Essentially, this is the speed at which the disk can present the required location to the laser head. The universal standard now is 7200 RPM for full-sized hard drives and 5400 RPM for laptop models.
There are models with spindle speeds up to 15000 RPM, but for an ordinary desktop PC, this is clearly overkill. Firstly, they are very expensive, 2-3 times more expensive than the usual 7200 RPM. Secondly, due to the high spindle speed, the disk wears out faster (though in domestic conditions, you are unlikely to load it that much).
Cache Size
Another parameter affecting speed is cache memory. This is a block of high-speed volatile memory that allows information to accumulate. For example, when you record a file on a hard drive, it can be written immediately to temporary memory, freeing the computer from this task, and later it will be written to the disk itself.
But to avoid delving into the details, remember – the more cache in your HDD, the better.
Replacing an HDD
The hard drive is connected to the computer by two SATA cables, one to the motherboard and the other from the power supply unit to provide power to your HDD. Remember that if you are replacing the only HDD, you need to copy the necessary data to a new device. Read below on how to do this.
How to Remove a Hard Drive
First, disconnect the power, unplug the cord from the socket or the power supply unit. This is important because even with the computer off, there is a chance of getting an electric shock. Although the case uses only 12V and it cannot harm your health, it can be unpleasant.
Next, remove the case cover, which is held by two screws at the back and slides to the left after unscrewing them. Note that there are rivets near the screws on the case, sometimes replaced by bolts, in which case you do not need to unscrew them.
If you have a case with a tempered glass cover, it is usually held by four screws with rubber plugs. You need to pry out the plug and unscrew the screw.
The big advantage of cases is that you do not need to remove anything from the computer to access the hard drive.
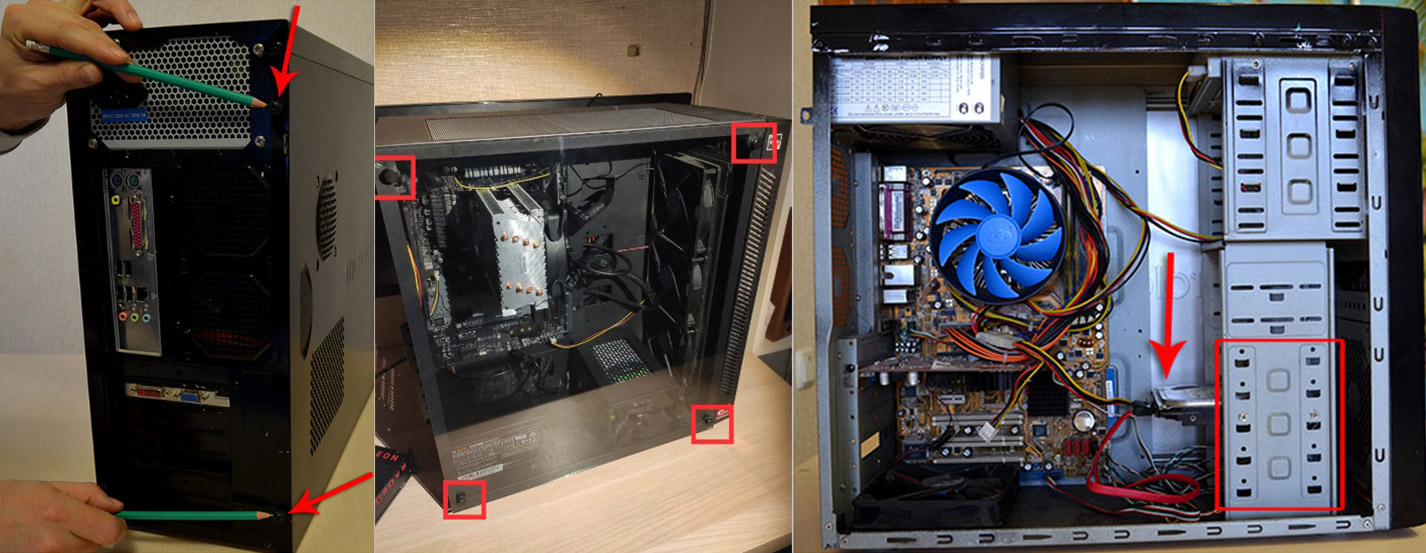
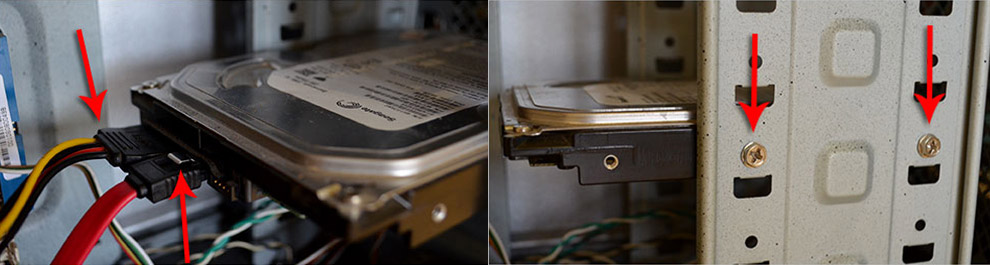
Disconnect the two cables going to it. Note: the smaller cable usually has a latch. It is located at the top, so it is clearly visible. To remove this cable from your HDD, pry it off before pulling out the cable.
Then remove the HDD from the rack. To do this, unscrew two screws at the front and back. If you do not have the tools to get there, you will have to remove the back cover too.
In some cases, the rack is located with outputs to the user, and removing the HDD is much easier. The best option is a quick-release connection on an eccentric clamp. A huge advantage is that cases using such clamps do not require a screwdriver for complete disassembly.
How to Install and Connect a Hard Drive
To install a new HDD, you need to follow the instructions above from the last to the first point. First, install the new drive on the rack, then connect the SATA cables to it.
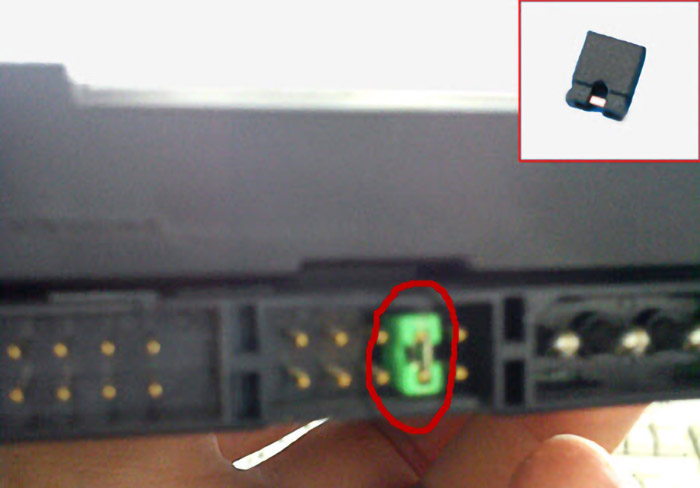
What Jumpers Should be Set on the Hard Drive?
In the old days, you could find jumpers on a hard drive that allowed you to set its place in the device hierarchy. This helped avoid conflicts with access to other devices in the system. Such jumpers were only on HDDs connected by ribbon cables, now there is no such mess, and we can use only SATA and set the hierarchy programmatically.
If you have an old computer and you are installing a hard drive on a ribbon cable, you need to set the main drive to the "Master" position, and all other devices to "Slave". Usually, the "Master" is connected to the end of the ribbon, and the "Slave" device is connected in the middle.
Such jumpers are also found on modern drives, but they are mostly unused since if you do not short the output pins, the system will automatically assign a role to your drive.
How to Install a Second HDD
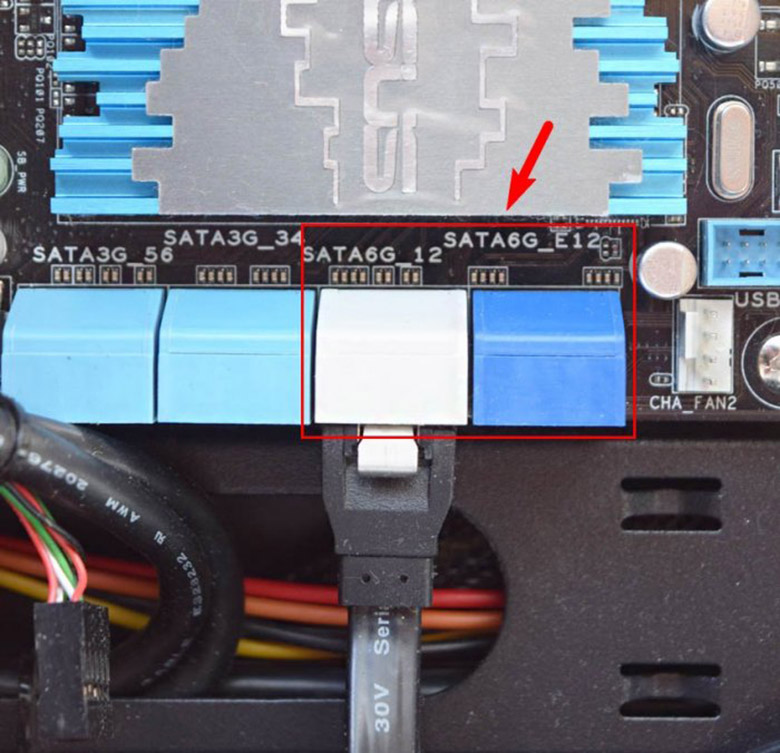
To install a second drive on your computer (whether SSD or HDD), you need a second SATA cable and a free power supply connector of the same type. The photo shows the cable that connects the hard drive to the motherboard.
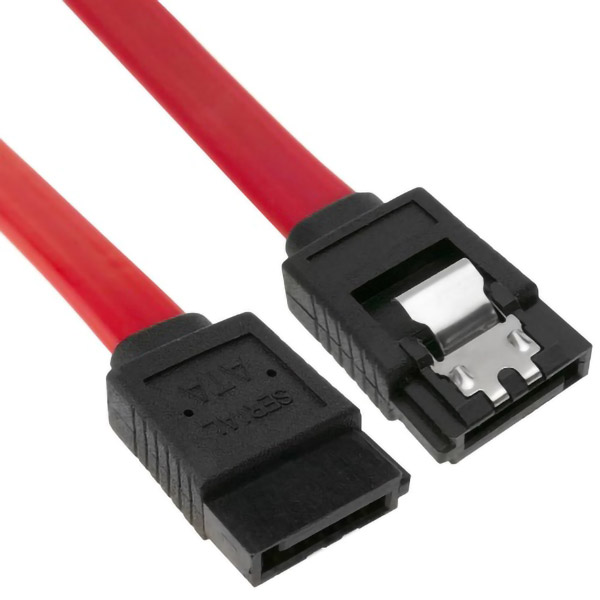
Turn off the computer, remove the cover, and secure the second drive in the rack. Then connect it, one cable to the motherboard, the other from the power supply unit.
Once you do this, you can start installing Windows (if this is the new main drive) or just start the computer and use it. This space will already be waiting for you in the system.
Pay attention to the SATA version when installing: the photo shows the outputs on the motherboard with labels. 1.5 GB/s – SATA 1, 3 GB/s – SATA 2, and 6 GB/s – SATA 3. Ideally, your HDD's capabilities should match the port's capabilities. To find out which SATA you have on your HDD, just look at the technical documentation, or you can search the case for the word "SATA" and see which version is written next to it.
Vertical and Horizontal Installation of a Hard Drive in a USB 3.0 Docking Station
Stationary
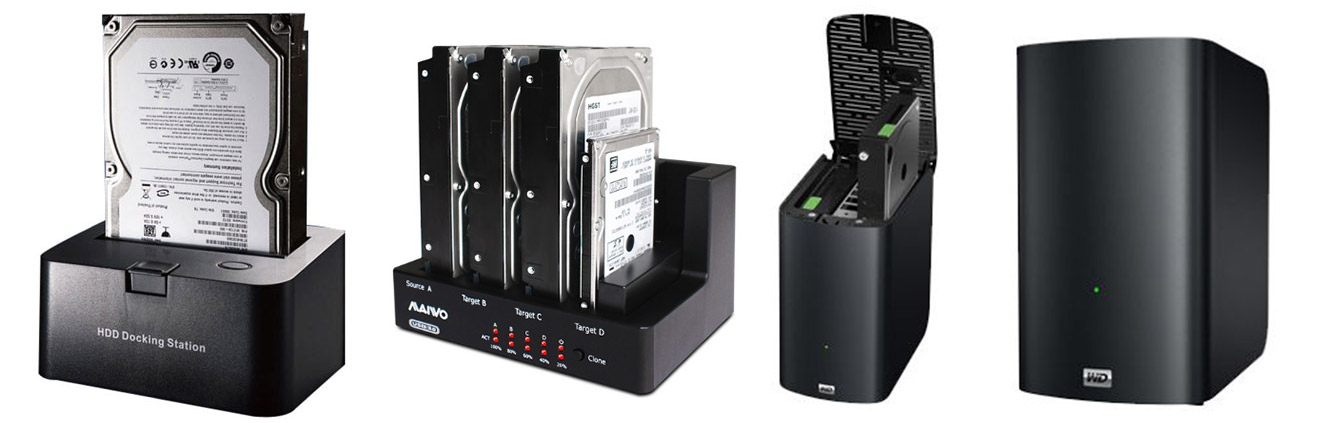
Mobile
There are adapters for hard drives that allow you to use them as a flash drive.
Connecting in such devices is as simple as possible. The main criterion is the absence of vibration and shocks on the hard drive body. That is, during transportation and operation, it must be firmly fixed in the case.
The second important nuance is transfer speed. It is hardly possible to consider an external hard drive as full-fledged due to quite strong speed limitations. To smooth this problem a bit, choose an adapter with USB 3.0 or higher.

Can You Install an HDD Upside Down?
The position of the hard drive does not matter; it can be placed at any angle. The main criterion is firm fastening, so it does not hang loosely. How you fix it does not matter in terms of reliability and performance.
How to Install a Hard Drive in a Sled
Sled is a slang term for any hard drive adapter. Let's consider an adapter that allows installing 2.5" devices in a 3.5" bay. Also, sleds can mean a laptop adapter, allowing you to replace an unnecessary DVD drive with a second hard drive, whether HDD or SSD in 2.5" form factor.
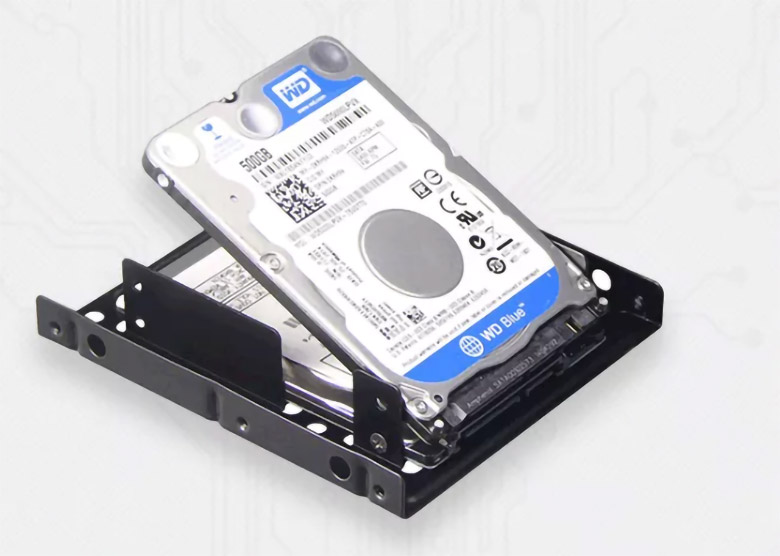
How to Install a Hard Drive in a 2.5" to 3.5" Adapter?
The photo shows an adapter that can hold two drives. They are secured with screws on the right and left, with 4 screws per drive. It is advisable to firmly secure HDD drives, while SSDs do not require firm fastening. The reason is that a hard drive has moving parts that can vibrate during operation; firm coupling with the case minimizes these vibrations.
If the drive is not secured during operation, all vibrations will gradually destroy the moving parts, such as the spindle and the laser head drive, which can fail. Not to mention that with constant vibrations, you have an increased risk of encountering errors during data recording and reading.
How to Install a Hard Drive in a Laptop Sled?
As shown in the photo, you need to use an HDD or SSD with a full-sized SATA connector. Meanwhile, the platform itself connects in place of the optical drive, which has a miniSATA connector.
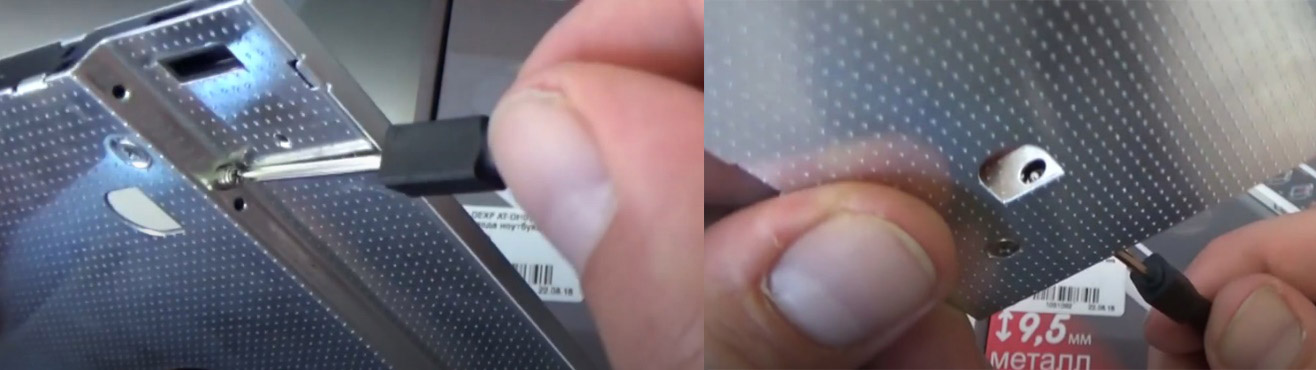
Once you unpack the sled, you can start installing the drive. First, take out the special screwdriver from its case and unscrew the built-in screws.
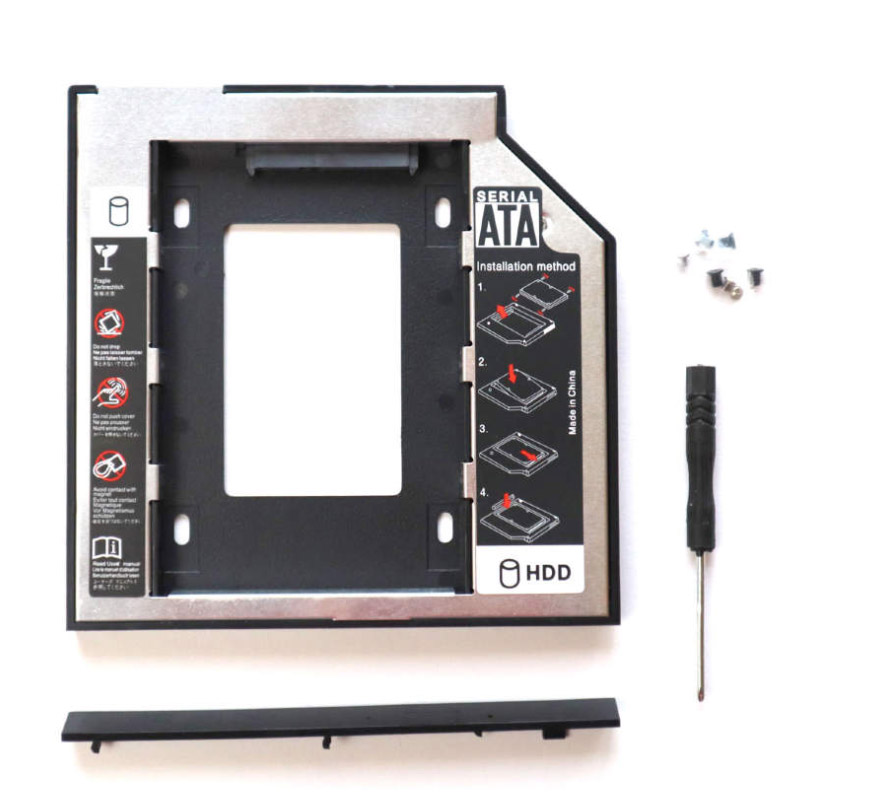
There is no need to unscrew completely; just move them slightly inside so that the hard drive itself can fit into the hole. Note that next to the HDD connector, there is a small switch. It changes the adapter's operation modes, and if you experience lags, reading/writing errors on the new drive, switch it to another position, which may fix the situation. Install the hard drive and press it tightly towards the connector. Now fix it with the screws you unscrewed at the beginning.
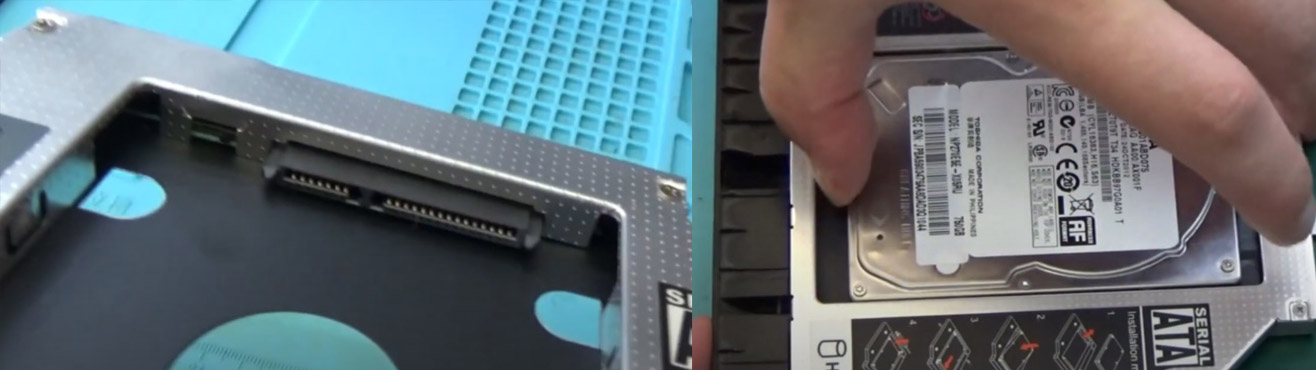
Next, you need to take out some elements from the old drive. The photo shows the screw that secures the drive. It usually has special markings to help you figure it out. After unscrewing it, pull out the drive and unscrew some parts from it, primarily the mount. You also need to remove the plastic plug; each laptop has a unique one, and to make everything look nice, you need to remove it and transfer it to the sled.
Screw the mount from the drive to the sled and insert all of it into the laptop, then secure the adapter with a screw on the bottom of the case.
How to Install a Second HDD in a Laptop
Follow the same instructions described above. Manufacturers rarely provide space for a second drive, so this method is universal for most laptop models.
Replacing an HDD in a Laptop
First, do not forget to copy the data; read further on how to do this. To replace the drive in a laptop, you need to turn it off and remove the battery. Remove the quick-access cover to the HDD as shown in the photo. If your laptop model does not have this, you will have to remove the entire back cover. There can be no general recommendations here, each model is disassembled differently, and detailed instructions can be found on the manufacturer's website or on videos on the internet.
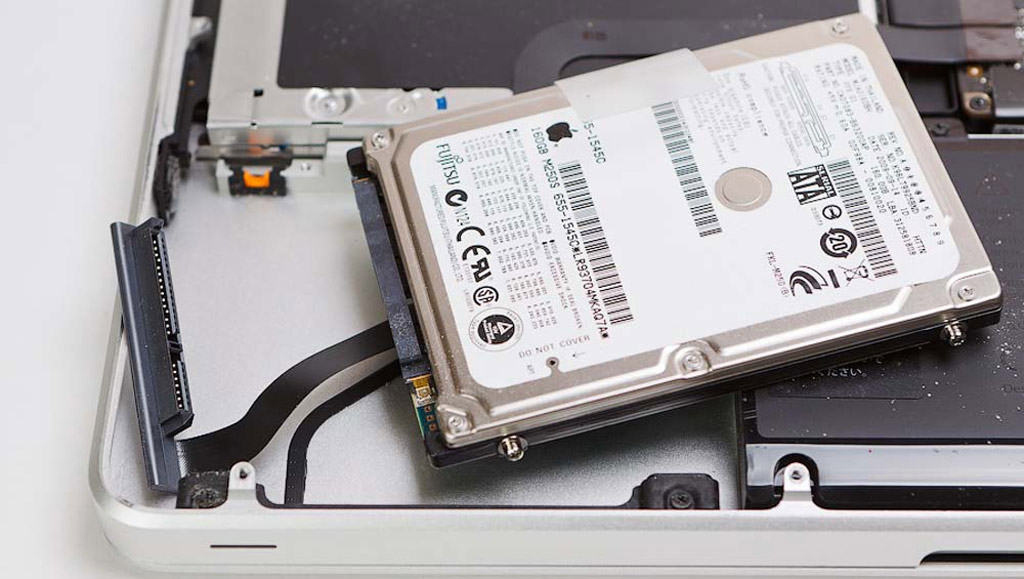
Remove the old drive from the case and disconnect it. Sometimes hard drives are secured with screws, which need to be unscrewed. The hard drive in a laptop is usually in an aluminum case or at least has removable mounts. These need to be removed and placed on the new HDD. Then secure the new device in place of the old one and screw it in the same way.
After that, close the quick-access cover, and you can continue using the laptop. But if this is your only drive in the system, you will need to install Windows on it.
How to Back Up Data Before Replacing a Hard Drive
Data transfer in most cases will be very long, especially if we are talking about large volumes or a huge number of small files. Each method has its limitations, drawbacks, and advantages.
Two HDDs
If it's a full-sized desktop PC, the easiest way is to install the new HDD as a second hard drive and transfer all data to it, then dispose of the old device. This is the most optimal option, requiring minimal effort and cost from you – a SATA cable costs less than 1 dollar, and in some hard drives, it comes as a kit.
- Advantages: fast, simple, and inexpensive.
- Disadvantages: cannot be used in laptops, all-in-ones, or mini-PCs.
HDD USB Adapter
By purchasing a USB adapter for your hard drive, connect the new drive to your computer and transfer the information to it, or use the old one to access the files recorded on it, albeit at a lower speed. If your computer supports USB 3.0, it's better to buy an adapter with this version of the connector.
- Advantages: a universal option for any computer.
- Disadvantages: low speed and the need to buy the adapter itself, although it is inexpensive.
USB Flash
If there are not many files and you have a flash drive at hand, you can write everything you need on it before replacing the drive.
- Advantages: a universal option and does not require additional costs, as everyone has a flash drive.
- Disadvantages: little space, transferring large volumes of data will be difficult. Quite a low data transfer speed, you will wait several hours, especially if you transfer many small files.
Cloud Storage
The top option for small amounts of data. Just have a high-speed internet connection and upload the data from your computer, laptop, phone, tablet, etc.
- Advantages: the most universal option, after the transfer, you can use this data on any device.
- Disadvantages: very low transfer speed, lower than USB 2.0. For storing large volumes of data, you need to rent space in the cloud, which can be expensive.
DVD Drive
Recording the necessary information on disks is a thing of the past, it is very long and even expensive because blank disks are not free. Moreover, your drive will be heavily loaded for a long time. But if there are no other options, you can write the data to a disk.
- Advantages: you can feel nostalgic for the bygone years when disks were still relevant.
- Disadvantages: long to record a blank disk, long to transfer data from it, disks are expensive, you need to pre-archive data and split it into parts to fit on one DVD.
And of course, you can always contact the UPGRADE CENTER HYPERPC – our specialists will perform all the necessary work for the impeccable performance of your machine.